Archive for the ‘open source’ Category

Can We Build Trustable Hardware?

Friday, December 27th, 2019

Why Open Hardware on Its Own Doesn’t Solve the Trust Problem

A few years ago, Sean ‘xobs’ Cross and I built an open-source laptop, Novena, from the circuit boards up, and shared our designs with the world. I’m a strong proponent of open hardware, because sharing knowledge is sharing power. One thing we didn’t anticipate was how much the press wanted to frame our open hardware adventure as a more trustable computer. If anything, the process of building Novena made me acutely aware of how little we could trust anything. As we vetted each part for openness and documentation, it became clear that you can’t boot any modern computer without several closed-source firmware blobs running between power-on and the first instruction of your code. Critics on the Internet suggested we should have built our own CPU and SSD if we really wanted to make something we could trust.

I chewed on that suggestion quite a bit. I used to be in the chip business, so the idea of building an open-source SoC from the ground-up wasn’t so crazy. However, the more I thought about it, the more I realized that this, too was short-sighted. In the process of making chips, I’ve also edited masks for chips; chips are surprisingly malleable, even post tape-out. I’ve also spent a decade wrangling supply chains, dealing with fakes, shoddy workmanship, undisclosed part substitutions – there are so many opportunities and motivations to swap out “good” chips for “bad” ones. Even if a factory could push out a perfectly vetted computer, you’ve got couriers, customs officials, and warehouse workers who can tamper the machine before it reaches the user. Finally, with today’s highly integrated e-commerce systems, injecting malicious hardware into the supply chain can be as easy as buying a product, tampering with it, packaging it into its original box and returning it to the seller so that it can be passed on to an unsuspecting victim.

If you want to learn more about tampering with hardware, check out my presentation at Bluehat.il 2019.

Based on these experiences, I’ve concluded that open hardware is precisely as trustworthy as closed hardware. Which is to say, I have no inherent reason to trust either at all. While open hardware has the opportunity to empower users to innovate and embody a more correct and transparent design intent than closed hardware, at the end of the day any hardware of sufficient complexity is not practical to verify, whether open or closed. Even if we published the complete mask set for a modern billion-transistor CPU, this “source code” is meaningless without a practical method to verify an equivalence between the mask set and the chip in your possession down to a near-atomic level without simultaneously destroying the CPU.

So why, then, is it that we feel we can trust open source software more than closed source software? After all, the Linux kernel is pushing over 25 million lines of code, and its list of contributors include corporations not typically associated with words like “privacy” or “trust”.

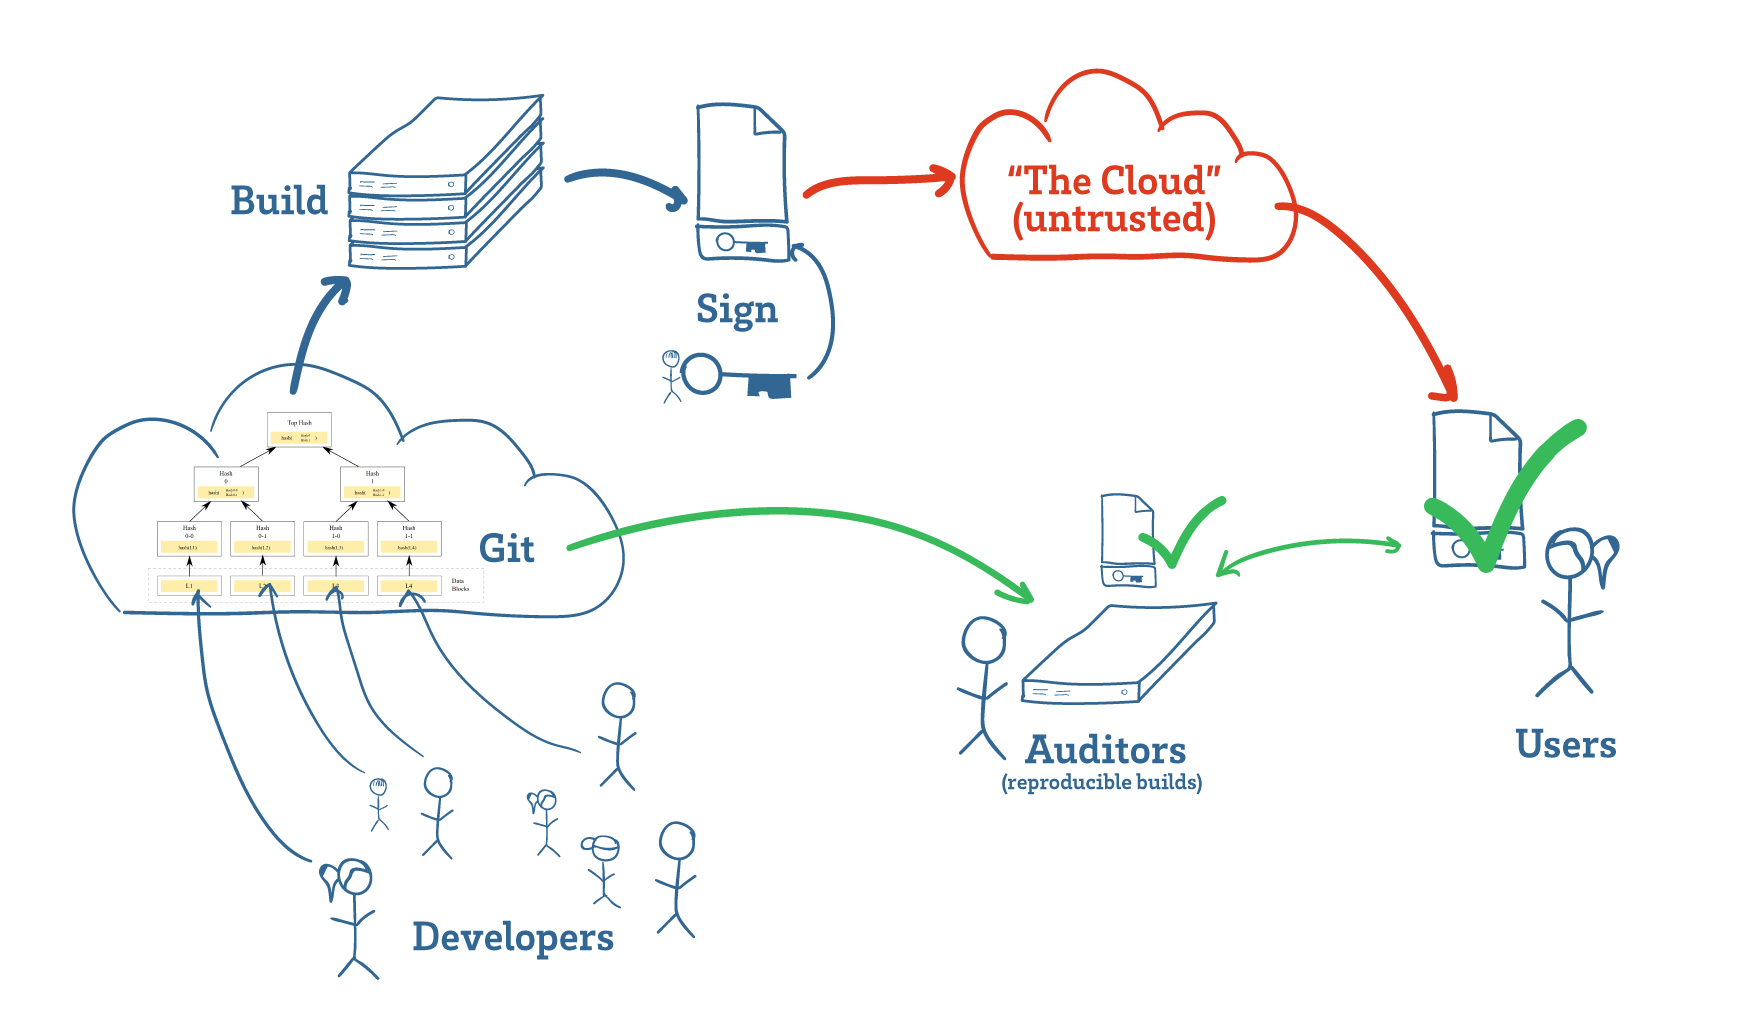
The key, it turns out, is that software has a mechanism for the near-perfect transfer of trust, allowing users to delegate the hard task of auditing programs to experts, and having that effort be translated to the user’s own copy of the program with mathematical precision. Thanks to this, we don’t have to worry about the “supply chain” for our programs; we don’t have to trust the cloud to trust our software.

Software developers manage source code using tools such as Git (above, cloud on left), which use Merkle trees to track changes. These hash trees link code to their development history, making it difficult to surreptitiously insert malicious code after it has been reviewed. Builds are then hashed and signed (above, key in the middle-top), and projects that support reproducible builds enable any third-party auditor to download, build, and confirm (above, green check marks) that the program a user is downloading matches the intent of the developers.

There’s a lot going on in the previous paragraph, but the key take-away is that the trust transfer mechanism in software relies on a thing called a “hash”. If you already know what a hash is, you can skip the next paragraph; otherwise read on.
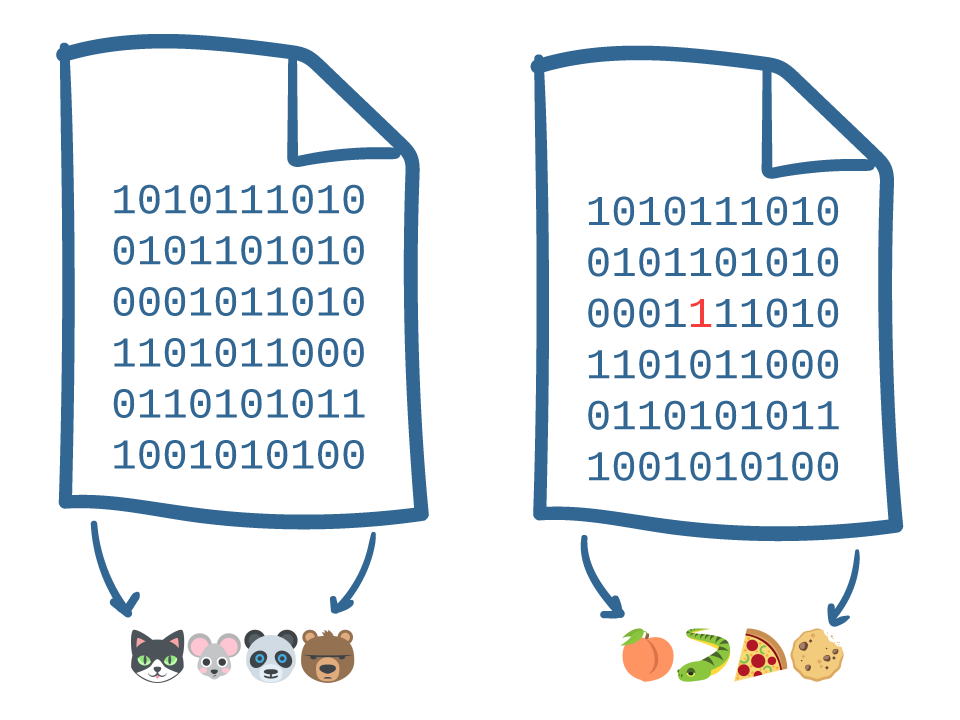
A hash turns an arbitrarily large file into a much shorter set of symbols: for example, the file on the left is turned into “cat-mouse-panda-bear”. These symbols have two important properties: even the tiniest change in the original file leads to an enormous change in the shorter set of symbols; and knowledge of the shorter set of symbols tells you virtually nothing about the original file. It’s the first property that really matters for the transfer of trust: basically, a hash is a quick and reliable way to identify small changes in large sets of data. As an example, the file on the right has one digit changed — can you find it? — but the hash has dramatically changed into “peach-snake-pizza-cookie”.

Because computer source code is also just a string of 1’s and 0’s, we can also use hash functions on computer source code, too. This allows us to quickly spot changes in code bases. When multiple developers work together, every contribution gets hashed with the previous contribution’s hashes, creating a tree of hashes. Any attempt to rewrite a contribution after it’s been committed to the tree is going to change the hash of everything from that point forward.

This is why we don’t have to review every one of the 25+ million lines of source inside the Linux kernel individually – we can trust a team of experts to review the code and sleep well knowing that their knowledge and expertise can be transferred into the exact copy of the program running on our very own computers, thanks to the power of hashing.

Because hashes are easy to compute, programs can be verified right before they are run. This is known as closing the “Time-of-Check vs Time-of-Use” (TOCTOU) gap. The smaller the gap between when the program is checked versus when it is run, the less opportunity there is for malicious actors to tamper with the code.
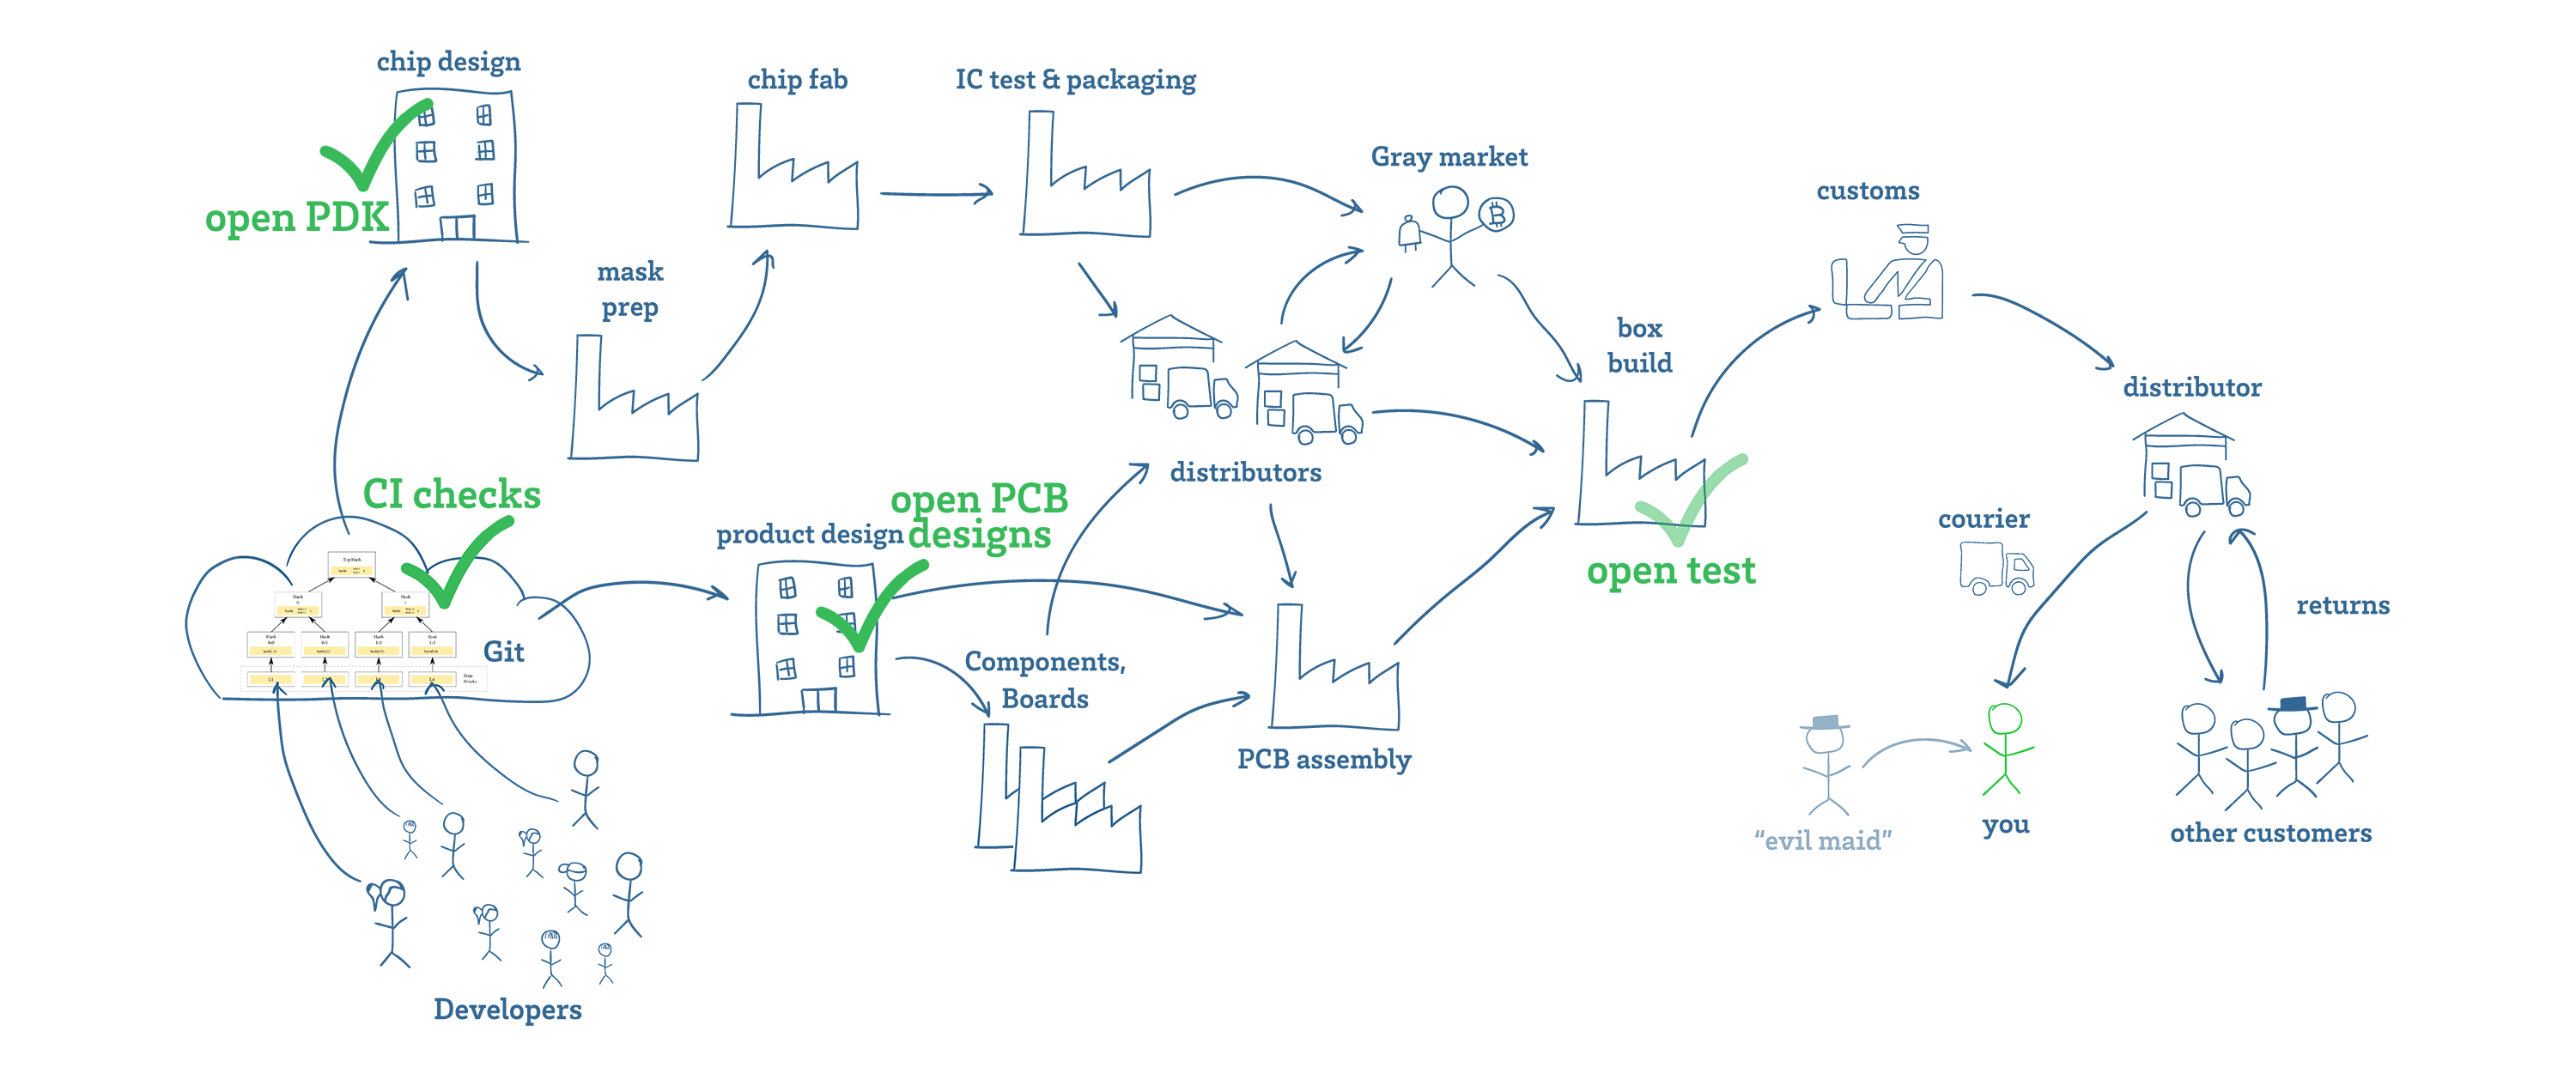
Now consider the analogous picture for open source in the context of hardware, shown above. If it looks complicated, that’s because it is: there are a lot of hands that touch your hardware before it gets to you!

Git can ensure that the original design files haven’t been tampered with, and openness can help ensure that a “best effort” has been made to build and test a device that is trustworthy. However, there are still numerous actors in the supply chain that can tamper with the hardware, and there is no “hardware hash function” that enables us to draw an equivalence between the intent of the developer, and the exact instance of hardware in any user’s possession. The best we can do to check a modern silicon chip is to destructively digest and delayer it for inspection in a SEM, or employ a building-sized microscope to perform ptychographic imaging.

It’s like the Heisenberg Uncertainty Principle, but for hardware: you can’t simultaneously be sure of a computer’s construction without disturbing its function. In other words, for hardware the time of check is decoupled from the time of use, creating opportunities for tampering by malicious actors.

Of course, we entirely rely upon hardware to faithfully compute the hashes and signatures necessary for the perfect trust transfer of trust in software. Tamper with the hardware, and all of a sudden all these clever maths are for naught: a malicious piece of hardware could forge the results of a hash computation, thus allowing bad code to appear identical to good code.

Three Principles for Building Trustable Hardware

So where does this leave us? Do we throw up our hands in despair? Is there any solution to the hardware verification problem?

I’ve pondered this problem for many years, and distilled my thoughts into three core principles:

1. Complexity is the enemy of verification. Without tools like hashes, Merkel trees and digital signatures to transfer trust between developers and users, we are left in a situation where we are reduced to relying on our own two eyes to assess the correct construction of our hardware. Using tools and apps to automate verification merely shifts the trust problem, as one can only trust the result of a verification tool if the tool itself can be verified. Thus, there is an exponential spiral in the cost and difficulty to verify a piece of hardware the further we drift from relying on our innate human senses. Ideally, the hardware is either trivially verifiable by a non-technical user, or with the technical help of a “trustable” acquaintance, e.g. someone within two degrees of separation in the social network.

2. Verify entire systems, not just components. Verifying the CPU does little good when the keyboard and display contain backdoors. Thus, our perimeter of verification must extend from the point of user interface all the way down to the silicon that carries out the secret computations. While open source secure chip efforts such as Keystone and OpenTitan are laudable and valuable elements of a trustable hardware ecosystem, they are ultimately insufficient by themselves for protecting a user’s private matters.

3. Empower end-users to verify and seal their hardware. Delegating verification and key generation to a central authority leaves users exposed to a wide range of supply chain attacks. Therefore, end users require sufficient documentation to verify that their hardware is correctly constructed. Once verified and provisioned with keys, the hardware also needs to be sealed, so that users do not need to conduct an exhaustive re-verification every time the device happens to leave their immediate person. In general, the better the seal, the longer the device may be left unattended without risk of secret material being physically extracted.

Unfortunately, the first and second principles conspire against everything we have come to expect of electronics and computers today. Since their inception, computer makers have been in an arms race to pack more features and more complexity into ever smaller packages. As a result, it is practically impossible to verify modern hardware, whether open or closed source. Instead, if trustworthiness is the top priority, one must pick a limited set of functions, and design the minimum viable verifiable product around that.

The Simplicity of Betrusted

In order to ground the conversation in something concrete, we (Sean ‘xobs’ Cross, Tom Mable, and I) have started a project called “Betrusted” that aims to translate these principles into a practically verifiable, and thus trustable, device. In line with the first principle, we simplify the device by limiting its function to secure text and voice chat, second-factor authentication, and the storage of digital currency.

This means Betrusted can’t browse the web; it has no “app store”; it won’t hail rides for you; and it can’t help you navigate a city. However, it will be able to keep your private conversations private, give you a solid second factor for authentication, and perhaps provide a safe spot to store digital currency.

In line with the second principle, we have curated a set of peripherals for Betrusted that extend the perimeter of trust to the user’s eyes and fingertips. This sets Betrusted apart from open source chip-only secure enclave projects.

Verifiable I/O

For example, the input surface for Betrusted is a physical keyboard. Physical keyboards have the benefit of being made of nothing but switches and wires, and are thus trivial to verify.
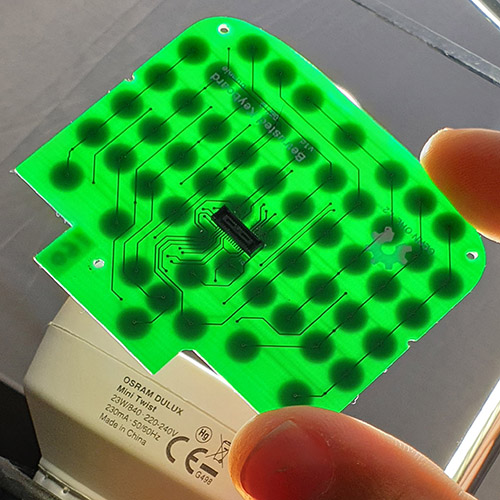
Betrusted’s keyboard is designed to be pulled out and inspected by simply holding it up to a light, and we support different languages by allowing users to change out the keyboard membrane.

The output surface for Betrusted is a black and white LCD with a high pixel density of 200ppi, approaching the performance of ePaper or print media, and is likely sufficient for most text chat, authentication, and banking applications. This display’s on-glass circuits are entirely constructed of transistors large enough to be 100% inspected using a bright light and a USB microscope. Below is an example of what one region of the display looks like through such a microscope at 50x magnification.

The meta-point about the simplicity of this display’s construction is that there are few places to hide effective back doors. This display is more trustable not just because we can observe every transistor; more importantly, we probably don’t have to, as there just aren’t enough transistors available to mount an attack.

Contrast this to the more sophisticated color displays, which rely on a fleck of silicon with millions of transistors implementing a frame buffer and command interface, and this controller chip is closed-source. Even if such a chip were open, verification would require a destructive method involving delayering and a SEM. Thus, the inspectability and simplicity of the LCD used in Betrusted is fairly unique in the world of displays.

Verifiable CPU

The CPU is, of course, the most problematic piece. I’ve put some thought into methods for the non-destructive inspection of chips. While it may be possible, I estimate it would cost tens of millions of dollars and a couple years to execute a proof of concept system. Unfortunately, funding such an effort would entail chasing venture capital, which would probably lead to a solution that’s closed-source. While this may be an opportunity to get rich selling services and licensing patented technology to governments and corporations, I am concerned that it may not effectively empower everyday people.

The TL;DR is that the near-term compromise solution is to use an FPGA. We rely on logic placement randomization to mitigate the threat of fixed silicon backdoors, and we rely on bitstream introspection to facilitate trust transfer from designers to user. If you don’t care about the technical details, skip to the next section.

The FPGA we plan to use for Betrusted’s CPU is the Spartan-7 FPGA from Xilinx’s “7-Series”, because its -1L model bests the Lattice ECP5 FPGA by a factor of 2-4x in power consumption. This is the difference between an “all-day” battery life for the Betrusted device, versus a “dead by noon” scenario. The downside of this approach is that the Spartan-7 FPGA is a closed source piece of silicon that currently relies on a proprietary compiler. However, there have been some compelling developments that help mitigate the threat of malicious implants or modifications within the silicon or FPGA toolchain. These are:

• The Symbiflow project is developing a F/OSS toolchain for 7-Series FPGA development, which may eventually eliminate any dependence upon opaque vendor toolchains to compile code for the devices.
Prjxray is documenting the bitstream format for 7-Series FPGAs. The results of this work-in-progress indicate that even if we can’t understand exactly what every bit does, we can at least detect novel features being activated. That is, the activation of a previously undisclosed back door or feature of the FPGA would not go unnoticed.
• The placement of logic with an FPGA can be trivially randomized by incorporating a random seed in the source code. This means it is not practically useful for an adversary to backdoor a few logic cells within an FPGA. A broadly effective silicon-level attack on an FPGA would lead to gross size changes in the silicon die that can be readily quantified non-destructively through X-rays. The efficacy of this mitigation is analogous to ASLR: it’s not bulletproof, but it’s cheap to execute with a significant payout in complicating potential attacks.

The ability to inspect compiled bitstreams in particular brings the CPU problem back to a software-like situation, where we can effectively transfer elements of trust from designers to the hardware level using mathematical tools. Thus, while detailed verification of an FPGA’s construction at the transistor-level is impractical (but still probably easier than a general-purpose CPU due to its regular structure), the combination of the FPGA’s non-determinism in logic and routing placement, new tools that will enable bitstream inspection, and the prospect of 100% F/OSS solutions to compile designs significantly raises the bar for trust transfer and verification of an FPGA-based CPU.
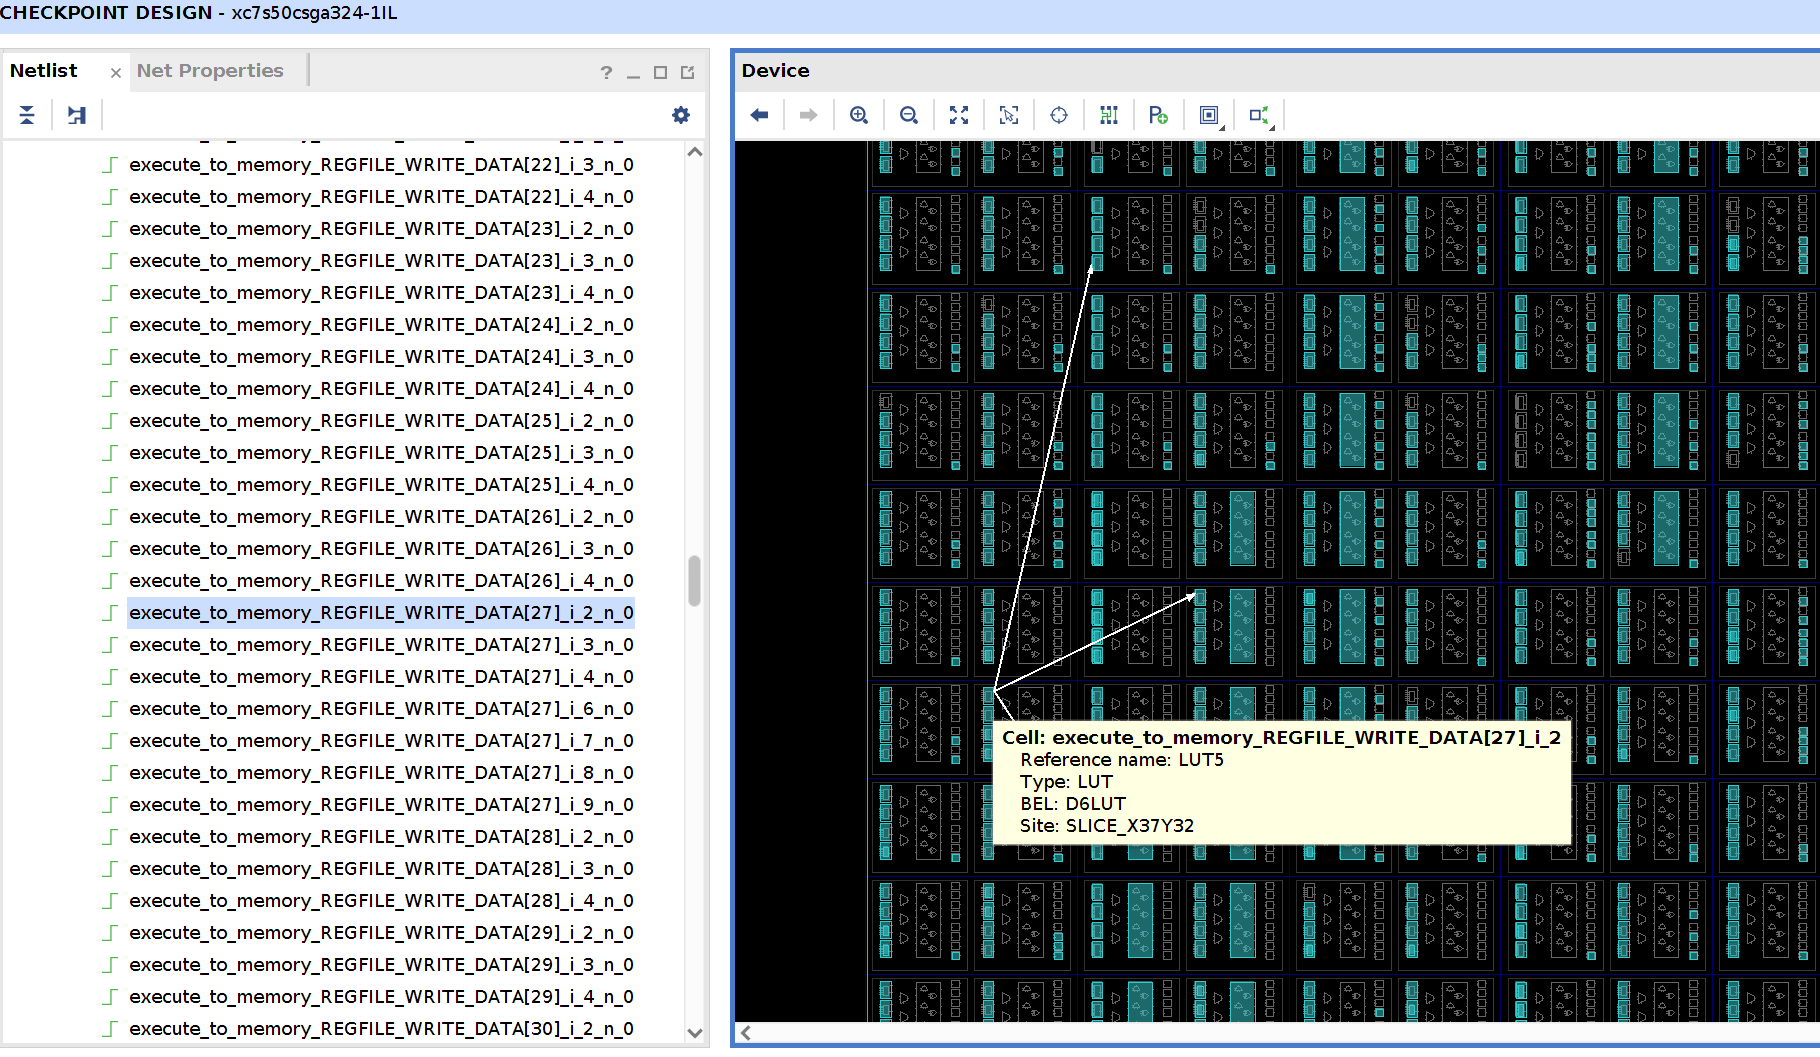

Above: a highlighted signal within an FPGA design tool, illustrating the notion that design intent can be correlated to hardware blocks within an FPGA.

One may argue that in fact, FPGAs may be the gold standard for verifiable and trustworthy hardware until a viable non-destructive method is developed for the verification of custom silicon. After all, even if the mask-level design for a chip is open sourced, how is one to divine that the chip in their possession faithfully implements every design feature?

The system described so far touches upon the first principle of simplicity, and the second principle of UI-to-silicon verification. It turns out that the 7-Series FPGA may also be able to meet the third principle, user-sealing of devices after inspection and acceptance.

Sealing Secrets within Betrusted

Transparency is great for verification, but users also need to be able to seal the hardware to protect their secrets. In an ideal work flow, users would:

1. Receive a Betrusted device

2. Confirm its correct construction through a combination of visual inspection and FPGA bitstream randomization and introspection, and

3. Provision their Betrusted device with secret keys and seal it.

Ideally, the keys are generated entirely within the Betrusted device itself, and once sealed it should be “difficult” for an adversary with direct physical possession of the device to extract or tamper with these keys.

We believe key generation and self-sealing should be achievable with a 7-series Xilinx device. This is made possible in part by leveraging the bitstream encryption features built into the FPGA hardware by Xilinx. At the time of writing, we are fairly close to understanding enough of the encryption formats and fuse burning mechanisms to provide a fully self-hosted, F/OSS solution for key generation and sealing.

As for how good the seal is, the answer is a bit technical. The TL;DR is that it should not be possible for someone to borrow a Betrusted device for a few hours and extract the keys, and any attempt to do so should leave the hardware permanently altered in obvious ways. The more nuanced answer is that the 7-series devices from Xilinx are quite popular, and have received extensive scrutiny over its lifetime by the broader security community. The best known attacks against the 256-bit CBC AES + SHA-256 HMAC used in these devices leverages hardware side channels to leak information between AES rounds. This attack requires unfettered access to the hardware and about 24 hours to collect data from 1.6 million chosen ciphertexts. While improvement is desirable, keep in mind that a decap-and-image operation to extract keys via physical inspection using a FIB takes around the same amount of time to execute. In other words, the absolute limit on how much one can protect secrets within hardware is probably driven more by physical tamper resistance measures than strictly cryptographic measures.

Furthermore, now that the principle of the side-channel attack has been disclosed, we can apply simple mitigations to frustrate this attack, such as gluing shut or removing the external configuration and debug interfaces necessary to present chosen ciphertexts to the FPGA. Users can also opt to use volatile SRAM-based encryption keys, which are immediately lost upon interruption of battery power, making attempts to remove the FPGA or modify the circuit board significantly riskier. This of course comes at the expense of accidental loss of the key should backup power be interrupted.

At the very least, with a 7-series device, a user will be well-aware that their device has been physically compromised, which is a good start; and in a limiting sense, all you can ever hope for from a tamper-protection standpoint.

You can learn more about the Betrusted project at our github page, https://betrusted.io. We think of Betrusted as more of a “hardware/software distro”, rather than as a product per se. We expect that it will be forked to fit the various specific needs and user scenarios of our diverse digital ecosystem. Whether or not we make completed Betrusted reference devices for sale will depend upon the feedback of the community; we’ve received widely varying opinions on the real demand for a device like this.

Trusting Betrusted vs Using Betrusted

I personally regard Betrusted as more of an evolution toward — rather than an end to — the quest for verifiable, trustworthy hardware. I’ve struggled for years to distill the reasons why openness is insufficient to solve trust problems in hardware into a succinct set of principles. I’m also sure these principles will continue to evolve as we develop a better and more sophisticated understanding of the use cases, their threat models, and the tools available to address them.

My personal motivation for Betrusted was to have private conversations with my non-technical friends. So, another huge hurdle in all of this will of course be user acceptance: would you ever care enough to take the time to verify your hardware? Verifying hardware takes effort, iPhones are just so convenient, Apple has a pretty compelling privacy pitch…and “anyways, good people like me have nothing to hide…right?” Perhaps our quixotic attempt to build a truly verifiable, trustworthy communications device may be received by everyday users as nothing more than a quirky curio.

Even so, I hope that by at least starting the conversation about the problem and spelling it out in concrete terms, we’re laying the framework for others to move the goal posts toward a safer, more private, and more trustworthy digital future.

The Betrusted team would like to extend a special thanks to the NLnet foundation for sponsoring our efforts.
Open Source Could Be a Casualty of the Trade War

Friday, June 21st, 2019

When I heard that ARM was to stop doing business with Huawei, I was a little bit puzzled as to how that worked: ARM is a British company owned by a Japanese conglomerate; how was the US able to extend its influence beyond its citizens and borders? A BBC report indicated that ARM had concerns over its US origin technologies. I discussed this topic with a friend of mine who works for a different non-US company that has also been asked to comply with the ban. He told me that apparently the US government has been sending cease and desist letters to some foreign companies that derive more than 25% of their revenue from US sources, threatening to hold their market access hostage in order to coerce them from doing business with Huawei.

Thus, America has been able to draw a ring around Huawei much larger than its immediate civilian influence; even international suppliers and non-citizens of the US are unable to do business with Huawei. I found the intent, scale, and level of aggression demonstrated by the US in acting against Huawei to be stunning: it’s no longer a skirmish or hard-ball diplomacy. We are in a trade war.

I was originally under the impression that the power to pull this off was a result of Trump’s Executive Order 13873 (EO13873), “Securing the Information and Communications Technology and Services Supply Chain”. I was wrong. Amazingly, this was nothing more than a simple administrative ruling by the Bureau of Industry and Security through powers granted via the “EAR” (Export Administration Regulation 15 CFR, subchapter C, parts 730-774), along with a sometimes surprisingly broad definition of what qualifies as export-controlled US technology. The administrative ruling cites Huawei’s indictment for willfully selling equipment to Iran as justification for commuting a broad technology export ban upon Huawei’s global operations.

Going Nuclear: Executive Order 13873
If a simple administrative ruling can inflict such widespread damage, what sorts of consequences does EO13873 hold? I decided to look up the text and read it.

EO13873 states there is a “national emergency” because “foreign adversaries” pose an “unusual and extraordinary threat to national security” because they are “increasingly creating and exploiting vulnerabilities in information and communications technology services”. Significantly, infocomm technology is broadly defined to include hardware and software, as well as on-line services.

It’s up to the whims of the administration to figure out who or what meets that criteria for a “foreign adversary”. While no entities have yet been designated as a foreign adversary, it is broadly expected that Huawei will be on that list.

According to the text of EO13873, being named a foreign adversary means one has engaged in a long-term pattern or serious instances of conduct significantly adverse to the national security of the US. In the case of Huawei, there has been remarkably little hard evidence of this. The published claims of backdoors or violations found in Huawei equipment are pretty run-of-the-mill; they could be just diagnostic or administrative tools that were mistakenly left into a production build. If this is the standard of evidence required to designate a foreign adversary, then most equipment vendors are guilty and at risk of being designated an adversary. For example, glaring flaws in Samsung SmartTVs enabled the CIA’s WeepingAngel malware to listen in on your conversations, yet Samsung is probably safe from this list.

If Huawei has truly engaged in a long-term pattern of conduct significantly adverse to national security, surely, some independent security research would have already found and published a paper on this. Given the level of fame and notoriety such a researcher would gain for finding the “smoking gun”, I can’t imagine the relative lack of high-profile disclosures is for a lack of effort or motivation. Hundreds of CVEs (Common Vulnerabilities and Exposures) have been filed against Huawei, yet none have been cited as national security threats. Meanwhile, even the NSA agrees that the Intel Management Engine is a threat, and has requested a special setting in Intel CPUs to disable it for their own secure computing platforms.

If Huawei were to be added to this list, it would set a significantly lower bar for evidence compared to the actions against similarly classified adversaries such as Iran or North Korea. Lowering the bar means other countries can justify taking equivalent action against the US or its allies with similarly scant evidence. This greatly amplifies the risk of this trade war spiraling even further out of control.

Supply Chains are an Effective but Indiscriminate Weapon
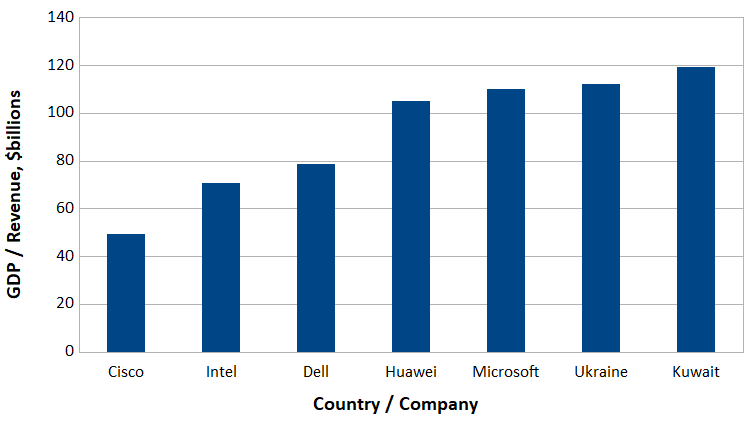
How big a deal is this compared to say, a military action where bombs are being dropped on real property? Here’s some comparisons I dug up to get a sense of scale for what’s going on. Huawei did $105 billion revenue in 2018 – 30% more than Intel, and comparable to the GDP of Ukraine – so Huawei is an economically significant target.


Above: Huawei 2018 revenue in comparison to other companies or country’s GDP.

Now, let’s compare this to the potential economic damage of a bomb being dropped on a factory: let’s say an oil refinery. One report indicated that the largest oil refinery explosion since 1974 caused around $1.8 billion in economic damage. So carving Huawei out of the global supply chain with an army of bureaucrats is better bang for the buck than sending in an actual army with guns, if the goal is to inflict economic damage.


Above: A section of “The 100 Largest Losses, 1974-2013: Large Property Damage Losses in the Hydrocarbon Industry, 23rd Edition”.

The problem is, unlike previous wars fought in distant territories, the splash damage of a trade war is not limited to a geographic region. The abrupt loss of Huawei as a customer will represent billions of dollars in losses for a large number of US component suppliers, resulting in collateral damage to US citizens and companies. Even though only a couple weeks have passed, I have first-hand awareness of one US-based supplier of components to Huawei who has gone from talks about acquisition/IPO to talks about bankruptcy and laying off hundreds of well-paid American staff; doubtless there will be more stories like this.

Reality Check: Supply Chains are Not Guided Missiles
The EAR was implemented 40 years ago, during the previous Cold War, as part of an effort to weaponize the US dollar. The US dollar’s power comes in part from the fact that most crude oil is traded for US dollars – countries like Saudi Arabia won’t accept any other currency in payment for its oil. Therefore sanctioned countries must acquire US dollars on the black market at highly unfavorable rates, resulting in a heavy economic toll on the sanctioned country. However, it’s worth taking a moment to note some very important differences between previous sanctions which used the US dollar as a weapon, and the notional use of the electronics supply chain as a weapon.

The most significant difference is that the US truly has an axiomatic monopoly on the supply of US dollars. Nobody can make a genuine US dollar, aside from the US – by definition. However, there is no such essential link between a geopolitical region and technology. Currently, US brands sell some of the best and most competitively priced technology, but also little of it is manufactured within the US. US may have one of the largest markets, but it does not own the supply chain.

It’s no secret that the US has outsourced most of its electronics supply chain overseas. From the fabrication of silicon chips, to the injection molding of plastic cases, to the assembly of smartphones, it happens overseas, with several essential links going through or influenced by China. Thus weaponizing the electronics supply chain is akin to fighting a war where bullets and breeches are sourced from your enemy. Victory is not inconceivable in such a situation, but it requires planning and precision to ensure that the first territory captured in the war hosts the factories that supply your base of power.

Using the global supply chain as a weapon is like launching a missile where your enemy controls the guidance systems: you can point it in the right direction, but where it goes after launch is out of your hands. Some of the first casualties of this trade war will be the American businesses that traded with Huawei. And if China chooses to reciprocate and limit US access to its supply chain, the US could take a hard hit.

Unintended Consequences: How Weaponized Trade Could Backfire And Weaken US Tech Leadership
One of the assumed outcomes of the trade war will be a dulling of China’s technical prowess, now that its access to the best and highest performing technology has been cut off. However, unlike oil or US dollars, US dominance in technology is not inherently linked to geographic territories. Instead, the reason why the US has maintained such a dominant position for such a long time is because of a free and unfettered global market for technology.

Technology is a constant question of “make vs. buy”: do we invest to build our own CPU, or just buy one from Intel or ARM? Large customers routinely consider the option of building their own royalty-free in-house solutions. In response to such threats, US-based providers lower their prices or improve their offerings, thus swinging the position of their customers from “make” to “buy”.

Thus, large players are rarely without options when their technology suppliers fail to cooperate. Huge companies routinely groom internal projects to create credible hedge positions that reduce market prices for acquiring various technologies. It just so happens the free market has been very effective at dissuading the likes of Huawei from investing the last hundred million dollars to bring those internal projects to market: the same market forces that drove the likes of the DEC Alpha and Sun Sparc CPUs to extinction have also kept Huawei’s CPU development ambitions at bay.

The erection of trade barriers disrupts the free market. Now, US companies will no longer feel the competitive pressure of Huawei, causing domestic prices to go up while reducing the urgency to innovate. In the meantime, Huawei will have no choice but to invest that last hundred million dollars to bring a solution to market. This in no way guarantees that Huawei’s ultimate solution will be better than anything the US has to offer, but one would be unwise to immediately dismiss the possibility of an outcome where Huawei, motivated by nationalism and financially backed by the Chinese government, might make a good hard swing at the fences and hit a home run.

The interest in investing in alternative technologies goes beyond Huawei. Before the trade war, hardly anyone in the Chinese government had heard about RISC-V, an open-source alternative to Intel and ARM CPUs. Now, my sources inform me it is a hot topic. While RISC-V lags behind ARM and Intel in terms of performance and maturity, one key thing it had been lacking is a major player to invest the money and manpower it takes to close the gap. The deep irony is that the US-based startup attempting to commercialize RISC-V – SiFive – will face strong headwinds trying to tap the sudden interest of Chinese partners like Huawei directly, given the politics of the situation.

Collateral Damage: Open Source
The trade war also begs a question about the fate of open source as a whole. For example, according to the 2017 Linux Foundation report, Huawei was a Platinum sponsor of the Linux Foundation – contributing $500,000 to the organization – and they were responsible for 1.5% of the code in the Linux kernel. This is more influence than Facebook, more than Texas Instruments, more than Broadcomm.

Because the administrative action so far against Huawei relies only upon export license restrictions, the Linux Foundation has been able to find shelter under a license exemption for open source software. However, should Huawei be designated as a “foreign adversary” under EO13873, it greatly expands the scope of the ban because it prohibits transactions with entities under the direction or influence of foreign adversaries. The executive order also broadly includes any information technology including hardware and software with no exemption for open source. In fact, it explicitly states that “…openness must be balanced by the need to protect our country against critical national security threats”. While the context of “open” in this case refers to an “investment climate”, I worry the text is broad enough to easily extend its reach into open source technologies.

There’s nothing in Github (or any other source-sharing platform) that prevents your code from being accessed by a foreign adversary and incorporated into their technological base, so there is an argument that open source developers are aiding and abetting an enemy by effectively sharing technology with them. Furthermore, in addition to considering requests to merge code from a technical standpoint, one has to also consider the possibility that the requester could be subject to the influence of Huawei, in which case accepting the merge may put you at risk of stiff penalties under the IEEPA (up to $250K for accidental violations; $1M and 20 years imprisonment for willful violations).

Hopefully there are bright and creative lawyers working on defenses to the potential issues raised by EO13873.

But I will say that ideologically, a core tenant of open source is non-discriminatory empowerment. When I was introduced to open source in the 90’s, the chief “bad guy” was Microsoft – people wanted to defend against “embrace, extend, extinguish” corporate practices, and by homesteading on the technological frontier with GNU/Linux we were ensuring that our livelihoods, independence, and security would never be beholden to a hostile corporate power.

Now, the world has changed. Our open source code may end up being labeled as enabling a “foreign adversary”. I never suspected that I could end up on the “wrong side” of politics by being a staunch advocate of open source, but here I am. My open source mission is to empower people to be technologically independent; to know that technology is not magic, so that nobody will ever be a slave to technology. This is true even if that means resisting my own government. The erosion of freedom starts with restricting access to “foreign adversaries”, and ends with the government arbitrarily picking politically convenient winners and losers to participate in the open source ecosystem.

Freedom means freedom, and I will stand to defend it.

Now that the US is carpet-bombing Huawei’s supply chain, I fear there is no turning back. The language already written into EO13873 sets the stage to threaten open source as a whole by drawing geopolitical and national security borders over otherwise non-discriminatory development efforts. While I still hold hope that the trade war could de-escalate, the proliferation and stockpiling of powerful anti-trade weapons like EO13873 is worrisome. Now is the time to raise awareness of the threat this poses to the open source world, so that we can prepare and come together to protect the freedoms we cherish the most.

I hope, in all earnestness, that open source shall not be a casualty of this trade war.

Exclave: Hardware Testing in Mass Production, Made Easier

Friday, December 21st, 2018

Reputable factories will test 100% of every product shipped. For example, the computer or phone you’re using to read this has had a plug inserted in every connector, along with dozens of internal and external tests run to confirm everything from the correct operation of the CPU to the proper function of the buttons.


A test station at a motherboard factory (2x speed). Every port and connector gets tested.

Even highly automated processes can yield defective units: entropy happens, and constant vigilance is required to guard against it. Even a very stable manufacturing process with a raw defect rate of around 1% is considered unacceptable by any reputable brand. This is one of the elephants in the digital fabrication room – just because a tool is digital doesn’t mean it will fabricate things perfectly with a push of the button. Every tool needs maintenance, and more often than not a skilled operator is required to inspect the final product and polish over rough edges.

To better grasp the magnitude of the factory test problem, consider the software that’s loaded on your computer. How did it get in there? Devices come out of the silicon foundry mostly blank. They typically don’t even have the innate knowledge to traverse a filesystem, much less connect to the Internet to download an update. Yet everyone has had the experience of waiting for an update to download and install. Factories must orchestrate a much more time-consuming and complicated process to bootstrap every device made, in order for you to enjoy the privilege of connecting to the Internet to download updates.

One might think, “surely, there must be a standardized way for handling this”.

Shockingly, there isn’t.

How Not To Test a Product

Unfortunately, first-time product makers often make the assumption that either products don’t require 100% testing (because the boards are assembled by robots, and robots don’t make mistakes, right?), or there is some otherwise standardized way to handle the initial firmware upload. Once upon a time, I was called upon to intervene on a factory test for an Arduino-derivative product, where the original test specification was literally “plug the device into the USB port of [your] laptop, and type in this AVRDUDE command to load code, and then type in another AVRDUDE command to set the fuses, and then use a multimeter to check the voltages on these two test points”. The test documentation was literally two photographs of the laptop screen and a paragraph of text. The product’s designer argued to the factory that this was sufficient because it it’s really quick and reliable: he does it in under two minutes, how could any competent factory that handles products with AVR chips not have heard of AVRDUDE, and besides he encountered no defects in the half dozen prototypes he produced by hand. This is in addition to an over-arching attitude of “whatever, I’m the smart guy who comes up with the ideas, just get your minimum-wage Chinese laborers to stop messing them up”.

The reality is that asking someone to manually run commands from a shell and read a meter for hours on end while expecting zero defects is neither humane nor practical. Furthermore, assuming the ability and judgment to run command line scripts isn’t realistic; testing is time-consuming, and thus often the least-skilled, lowest wage laborers are employed for the process. Ironically, there is no correlation between the skills required to assemble a computer, and the skills required to operate a computer. Thus, in order for the factory to meet the product designer’s expectation of low labor cost with simultaneously high quality, it’s up to the product designer to come up with an automated, fool-proof test jig.

Introducing the Test Jig: The Product Behind the Product

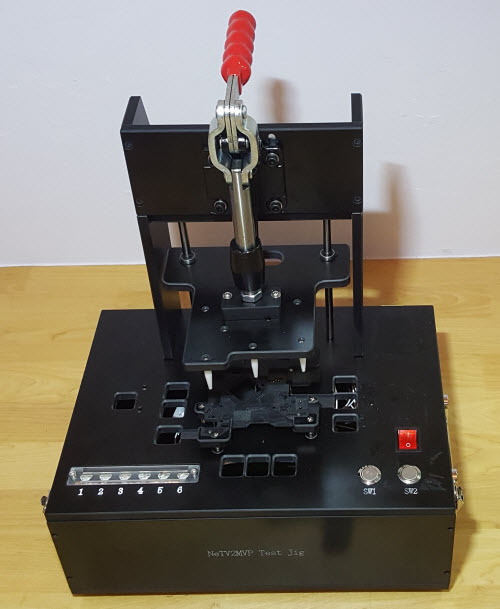
“Test jig” is a generic term any tool designed to assist with production testing. However, there is a basic format for a test jig chassis, and demand for test jig chassis is so high in places like Shenzhen that entire cottage industries have sprung up to support the demand. Most circuit board test jigs look a bit like this:


Above: NeTV2 circuit board test jig

And the short video below highlights the spring-loaded pogo pins of the test jig, along with how a circuit board is inserted into a test jig and clamped in place for testing.


Above: Inserting an NeTV2 PCB into its test jig.

As you can see in the video, the circuit board is placed into a precision-milled platter that moves along spring-loaded rails, allowing the board to engage with pogo-pin style test points underneath. As test points consume precious space on the circuit board, the overall mechanical accuracy of the system has to be better than +/-1mm once all tolerances are considered over thousands of cycles of wear and tear, in order to keep the test points a reasonable size (under 2mm in diameter).

The specific test jig shown above measures 12 separate DC voltages, performs a basic JTAG ID code check on the FPGA, loads firmware, and tests the on-board DRAM all in under 20 seconds. It’s the preliminary “fast test” of the NeTV2 product, meant to screen out gross solder faults and it provides an estimated coverage of about 80% of the solder joints on the PCB. The remaining 20% of the solder joints belong principally to connectors, which require a much more labor-intensive manual test to check.

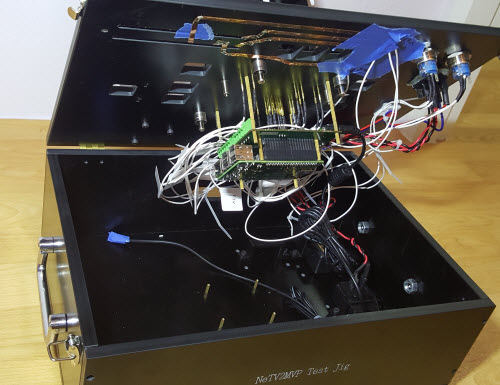
Here’s a look inside the test jig:

If it looks complicated, that’s because it is. Test jig complexity is correlated with product complexity, which is why I like to say the test jig is the “product behind the product”. In some cases, a product designer may spend even more time designing a test jig than they spend designing the product itself. There’s a very large space of problems to consider when implementing a test jig, ranging from test coverage to operator fatigue, and of course throughput and reliability.

Here’s a list of the basic issues to consider when designing a test jig:

  • Coverage: How to test every single feature?
  • UX: Who is interpreting your test data? How to internationalize the UI by using symbols and colors instead of text, and how to minimize operator fatigue?
  • Automation: What’s the quickest way to set up and tear down tests? How to avoid relying on human judgment?
  • Audit & traceability: How do you enforce testing standards? How to incorporate logging and coupons to facilitate material traceability?
  • Updates: What do you do when the tester needs a patch or update? How do you keep the test program in lock-step with the current firmware release?
  • Responsibility: Who is responsible for product quality? How do you create a natural incentive to design-for-test from the very first product sketch?
  • Code Structure: How do you maintain the tester’s code base? It’s tempting to think that test jig code should be write-once, since it’s going into a single device with a limited user base. However, the reality of production is rarely so simple, and it pays to structure your code base so that it’s self-checking, modular, reconfigurable, and reliable.

Each of these bullet points are aspects of test jig design that I have learned from the school of hard knocks.

Read on, and avoid my mistakes.

Coverage

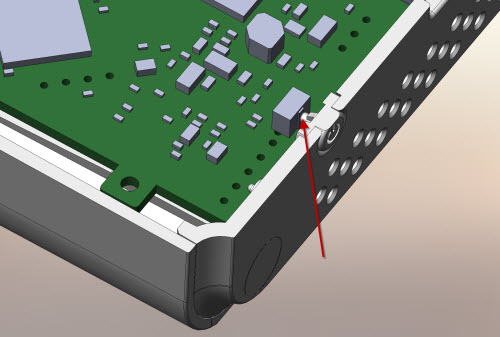
Ideally, a tester should cover 100% of the features of a product. But what, exactly, constitutes a feature? I once designed a product called the Chumby One, and I also designed its test procedure. I tried my best to cover all of its features, but I missed one: the power button. It seemed simple enough – just a switch, what could go wrong? It turns out that over the course of production, the tolerance between the mechanical switch pusher and the electrical switch mechanism had drifted to the point where pushing on the cap would not contact the electrical switch itself, leading to a cohort of returns from that production lot.

Even the simplest of mechanisms is a feature that needs to be tested.

Since that experience, I’ve adopted an “inside/outside” methodology to derive the test feature list. First, I look “inside” the product, going through the schematic and picking key features for testing. The priority is to check for solder faults as quickly as possible, based on the assumption that the constituent components are 100% pre-tested and reliable. Then, I look at the product from the “outside”, as a consumer might approach it. First, I look at the marketing brochure and see what was promised: “world class WiFi performance” demands a different level of test from “product has WiFi”. Then, I try to imagine all the ways a customer might interact with the product – such as pressing the power button – and add those points to the test list. This means every connector needs to have something stuffed in it, every switch pressed, every indicator light must get checked.


Red arrow calls out the mechanical switch pusher that drifted out of tolerance with the corresponding electrical switch

UX

Test jig UX can have a large impact on test throughput and reliability; test operators are human, and like all humans are susceptible to fatigue and boredom. A startup I worked with once told me a story of how a simple UX change drastically improved test throughput. They had a test that would take 10 minutes on average to run, so in order to achieve a net throughput of around 1 minute per unit, they provided the factory 10 testers. Significantly, the test run-time would vary from unit to unit, with a variance of several minutes from unit to unit. Unfortunately, the only indicator of test state was a single light that could either flash or change color. Furthermore, the lighting pattern of units that failed testing bore a resemblance to units that were still running the test, so even when the operator noticed a unit that finished testing, they would often overlook failed units, assuming they were still running the test. As a result, the actual throughput achieved on their first production run was about one unit every 5 minutes — driving up labor costs dramatically.

Once the they refactored the UX to include an audible chime that would play when the test was finished, aggregate test cycle time dropped to a bit over a minute – much closer to the original estimate.

Thus, while one might think UX is just for users, I’ve found it pays to make wireframes and mock-ups for the tester itself, and to spend some developer cycles to create an operator-friendly test program. In some ways, tester UX design is more challenging than the product UX: ideally, you’re creating a UX with icons that are internationally recognizeable, using little or no text, so operators anywhere in the world can just sit down and use it with no special training. Furthermore, you’re trying to create user engagement with something as banal as a test – something that’s literally as boring as watching paint dry. I’ve even gone so far as putting a mini-game in the middle of a long test sequence to keep operators attentive. The mini-game was of course directly relevant to the testing certain hardware sensors, but it was surprisingly effective because the operators would race each other on the mini-game to see who could finish the fastest, boosting throughput and increasing worker happiness.

At the end of the day, factories are powered by humans, and it pays to employ a human-first design process when crafting test programs.

Automation

Human operators are prone to error. The more a test can be automated, the more reliable it can be, and in the long run automation will save money. I once visited a large mobile phone maker’s factory, and witnessed a gymnasium-sized room full of test stations replaced by a pair of fully robotic test stations. Instead of hundreds of operators plugging cables in and checking aspects like screen and camera quality, a delicate ballet of robotic actuators would plug connectors into every port in a fraction of a second, and every feature of the phone from the camera to the GPS is tested in a couple of minutes. The test stations apparently cost about a million dollars to develop, but the empty cavern of idle test jigs sitting next to it was clear testament to the labor cost savings of such a high degree of automation.

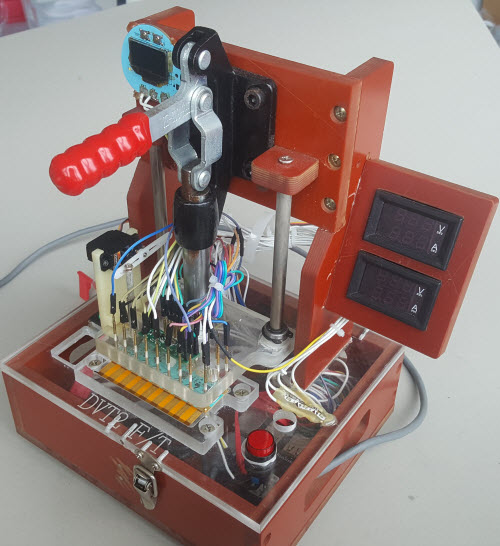
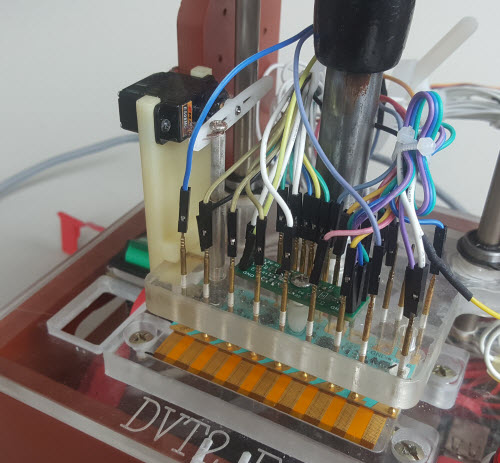
At the smaller scales more typical of startups, automation can happen but it needs to be judiciously applied. Every robotic actuator takes time and money to develop, and they are also prone to wear-out and eventual failure. For the Chibitronics Chibi Chip product, there’s a single mechanical switch on the board, and we developed a simple servo mechanism to actuate the plunger. However, despite using a series-elastic spring and a foam pad to avoid over-stressing the servo motor, over time, we’ve found the motor still fails, and operators have disconnected it in favor of manually pushing the button at the right time.


The Chibi Chip test jig


Detail view of the reset switch servo

Indicator lights can also be tricky to test because the lighting conditions in a factory can be highly variable. Sometimes the floor is flooded by sunlight; other times, it’s lit by dim fluorescent lamps or LED bulbs, each with distinct noise signatures. A simple photodetector will be unreliable unless you can perfectly shield the device under test (DUT) from stray light sources. However, if the product’s LEDs can be modulated (with a PWM waveform, for example), the modulation can be detected through an AC-coupled photodetector. This system tends to be more reliable as the AC coupling rejects sunlight, and the modulation frequency can be chosen to be distinct from other stray light noise sources in the factory.

In general, the gold standard for test automation is to put the DUT into a jig, press a button, wait, and then a red or green light indicates if the device passes or fails. For simple products, this should be achievable, but reasonable exceptions should be made depending upon the resources available in a startup to implement tests versus the potential frequency and impact of a particular feature escaping the test process. For example, in the case of NeTV2, the functionality of indicator LEDs and the fan are visually inspected by the operator; but in my judgment, all the components involved have generous tolerances and are less likely to be assembled incorrectly, and there are other points downstream of the PCB test during the assembly process where the LEDs and fan operation will be checked yet again, further reducing the likelihood of these features escaping the test process.

Audit and Traceability

Here’s a typical failure scenario at a factory: one operator is running two testers in parallel. The lunch bell rings, and the operator gets up and leaves without noting the status of the test (if you’ve been doing the same thing over and over for the past four hours and running on an empty belly, you’d do the same thing too). After lunch, the operator sits down again, and has to recall whether the units in front of her have been tested or not. As a result of this arbitrary judgment call, sometimes units that didn’t pass test, or weren’t even tested at all, slip into the tested product bins after a shift change.

This is one of the many reasons why it pays to incorporate some sort of audit and traceability program into the tester and product itself. The exact nature of the program will depend greatly upon the exact nature of the product and amount of developer resources available, but a simple example is structuring the test program so that a serial number isn’t generated for the product until all the tests pass – thus, the serial number is a kind of “coupon” to prove the unit has passed test. In the operator-returning-from-lunch scenario, she just has to check for the presence of a serial number to determine the testing state of a particular unit.


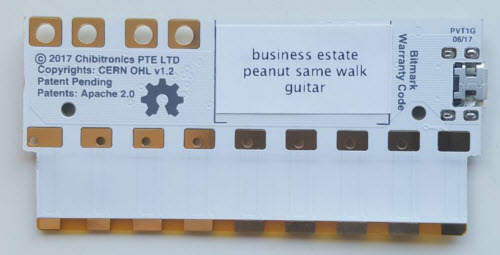
The Chibi Chip uses Bitmarks as a coupon to indicate when they have passed test. The Bitmarks also help prevent warranty fraud and deters cloning.

Sometimes I also burn a log of the test into the product itself. It’s important to make the log a circular buffer that can store more than one test run, because often times products that fail test the first time must be retested several times as it’s reworked and repaired. This way, if a product is returned by a user, I can query the log and see a fairly complete history of the product’s rework experience in the factory. This is incredibly helpful in debugging factory process issues and holding the factory accountable for marginal practices such as re-testing a device multiple times without repairing it, with the hope that they get lucky and get a “pass” out of the tester due to random environmental fluctuations.

Ideally, these logs are sent up to the cloud or a server directly, but that will depend heavily upon the reliability of the Internet connectivity at your facility. Internet is notoriously unreliable in China, especially to servers not located on the mainland, and so sometimes a small startup with limited resources has to make compromises about the extent and nature of audit and traceability achievable on the factory floor.

Updates

Consumer electronic products are increasingly just software wrapped in a plastic shell. While the hardware itself must stabilize months before production, the software in a product continues to evolve, especially in Internet-connected products that support over-the-air updates. Sometimes patches to a product’s firmware can profoundly alter low-level APIs, breaking the factory test program. For example, I had a product once where the audio drivers went through a major upgrade, going from OSS to ALSA. This changed the way the microphone subsystem was accessed, causing the microphone test to fail in production. Thus user firmware updates can also necessitate a tester program update.

If a test jig was engineered as a stand-alone box that requires logging into a terminal to upgrade, every time the software team pushes an update, guess what – you’re hopping on a plane to the factory to log in to the test jig and upgrade it. This is not a sustainable upgrade plan for products that have complex, constantly evolving internal firmware; thus, as the test jig designer, it’s well-advised to build a secure remote upgrade process into the test jig itself.


That’s me about 12 years ago on a factory floor at 2AM debugging a testjig update gone wrong, bringing production to a screeching halt. Don’t be like me; you can do better!

In addition a remote upgrade mechanism, you’re going to need a way to validate the test jig update without having to bring down a production line. In order to help with this, I always keep a physical copy of the production test jig in my office, so I can validate testjig updates from the comfort of my office before pushing them to the production floor. I try my best to keep the local jig an exact copy of what’s on the line; this may involve taking snapshots of the firmware image or swapping out OS drives between development and production versions, or deliberately breaking features that have somehow failed on the production jigs. This process is inspired by the engineers at JPL and NASA who keep an exact copy of Mars-based rovers on Earth, so they can thoroughly test an update before pushing it to the rover on Mars. While this discipline can be inconvenient and incurs the cost of an extra test jig, it’s inevitably cheaper than having to book a last minute flight to your factory to fix things because of an update gone wrong.

As for the upgrade mechanism itself, how fancy and secure you want to get has virtually no limit; I’ve done everything from manual swaps of USB thumb drives that contain the tester configuration data to a private VPN via a dedicated 3G-to-wifi gateway deployed at the factory site. The nature of the product (e.g. does it contain security keys, how often is the product firmware updated) and the funding level of your organization will heavily influence the architecture of the upgrade process.

Responsibility

Given how much effort it takes to build a good test jig, it’s tempting to free up precious developer resources by simply outsourcing the test jig to a third party. I’ve almost never found this to be a good idea. First of all, nobody but the developer knows what skeletons are hidden in a product’s closet. There’s what’s written in the spec, but then there is how faithfully the spec was implemented. Of course, in an ideal world, all specs were perfectly met, but only the developer has a true sense of how spot-on the implementation ended up. This drives the second point, which is avoiding the blame game. By throwing tests over the fence to a third party, if a test isn’t easy to implement or is generating false results, it’s easy to get into a finger-pointing exercise over who is at fault: the developer for not meeting the specs, or the test developer for not being creative enough to implement the test without necessitating design changes.

However, when the developer knows they are ultimately on the hook for the test jig, from day one the developer thinks about design for test. Where will the test points go? How do we make internal state easily visible? What bring-up sequence gives us the most test coverage in the shortest amount of time? By making the developer responsible for the test jig, the test program comes together as the product matures. Bring-up scripts used to validate the product are quickly converted to factory tests, and overall the product achieves a higher standard of testability while saving the money and resources that would otherwise be spent trying to coordinate between two parties with conflicting self-interests.

Code Structure

It’s tempting to think about a test jig as a pile of write-once code that doesn’t need to be maintainable. For simple products, one can definitely get away with this mentality. However, I’ve been bitten more than once by fragile code bases inside production testers. The most typical scenario where things break is when I have to change the order of tests, in order to prioritize testing problematic features first. It doesn’t make sense to test a dozen high-yielding features before running a test on a feature with a known yield issue. That just wastes operator time, and runs up the cost of production.

It’s also hard to predict before production what the most frequent mode of failure would be – after all, any failures you could have anticipated would already be designed out! So, quite often in the middle of an early production run, I’m challenged with having to change the order of tests in a complex sequence of tests to optimize operator time and improve production throughput.

Tests almost always have dependencies – you have to power on the board before you can flash the firmware; you need firmware before you can connect to wifi; you need credentials to connect to wifi; you have to clean up the test credentials before shipping the product. However, if the process that cleans up the test credentials is also responsible for cleaning up any other temporary tester files (for example, a flag that also sets Bluetooth into test mode), moving the wifi test sequence earlier could result in tester configuration files being left on the customer image, potentially leading to unexpected behaviors (such as Bluetooth still being in test mode in the shipping product!).

Thus, it’s helpful to have some infrastructure for tests that keeps each test modular while enforcing dependencies. Although one could write this code every single time from scratch, we encounter this problem so regularly that Sean ‘Xobs’ Cross set out to create a testjig management system to solve this problem “once and for all”. The result is a project he calls Exclave, with the idea being that Exclave – like an actual geographical exclave – is a tiny bit of territory that you can retain control of inside a foreign factory.

Introducing Exclave

Exclave is a scaffold designed to give structure to an otherwise amorphous blob of test code, while minimizing the amount of overhead required of the product designer to achieve this structure. The basic features of Exclave are as follows:

  • Code Re-use. During product bring-up, designers write simple scripts to validate each feature individually. Exclave attempts to re-use these scripts by making no assumption about the language used to write them. Python, C, Bash, Node.js, Rust – all are welcome, so long as they run on a command line and can return an exit code.
  • Automated dependency resolution. Each test routine is associated with a “.test” descriptor which describes the dependencies and timeout for a given script, which are then automatically resolved by Exclave.
  • Scenario management. Test descriptors are strung together into scenarios, which can be selected dynamically based on the real-time requirements of the factory.
  • Triggers. Typically a test is started by pressing a button, but Exclave’s flexible triggering system also allows tests to start on other cues, such as hot-plug events.
  • Multiple UI targets. Test jig UI can range from a red/green light to a serial console device to a full graphical interface running on a monitor. Exclave has a system for interpreting test results and driving multiple UI sinks. This allows for fast product debugging by attaching a GUI (via an HDMI monitor or laptop) while maintaining compatibility with cost-efficient LED indicators favored for production scale-up.


Above: Exclave helps migrate lab-bench validation code to production-grade factory tests.

To get a little flavor on what Exclave looks like in practice, let’s look at a couple of the tests implemented in the NeTV2 production test flow. First, the production test is split into two repositories: the test descriptors, and the graphical UI. Note that by housing all the tests in github, we also solve the tester upgrade problem by providing the factory with a set git repo management scripts mapped to double-clickable desktop icons.

These repositories are installed on a Raspberry Pi contained within the test jig, and Exclave is started on boot as a systemd service. The service runs a simple script that fires up Exclave in a target directory which contains a “.jig” file. The “netv2.jig” file specifies the default scenario, among other things.

Here’s an example of what a quick test scenario looks like:

This scenario runs a variety of scripts in different languages that: turn on the device (bash/C), checks voltages (C), checks ID code of the FPGA (bash/openOCD), loads a test bitstream (bash/openOCD), checks that the REPL shell can start on the FPGA (Expect/TCL), and then runs a RAM test (Expect/TCL) before shutting the board down (bash/C). Many of these scripts were copied directly from code used during board bring-up and system validation.

A basic operation that’s surprisingly tricky to do right is checking for terminal interaction (REPL shell) via serial port. Writing a C or bash script that does this correctly and gracefully handles all error cases is hard, but fortunately someone already solved this problem with the “Expect” TCL extension. Here’s what the REPL shell test descriptor looks like in Exclave:

As you can see, this points to a couple other tests as dependencies, sets a time-out, and also designates the location of the Expect script.

And this is what the Expect script looks like:

This one is a bit more specialized to the NeTV2, but basically, it looks for the NeTV2 tester firmware shell prompt, which is “TESTER_NX8D>”; the system will attempt to recover this prompt by sending a carriage-return sequence once every two seconds and searching for this special string in return. If it receives the string “BIOS” instead, this indicates that the NeTV2 failed to boot and escaped into the ROM BIOS, probably due to a RAM error; at which point, the Expect script prints a bunch of JSON, which is automatically passed up to the UI layer by Exclave to create a human-readable error message.

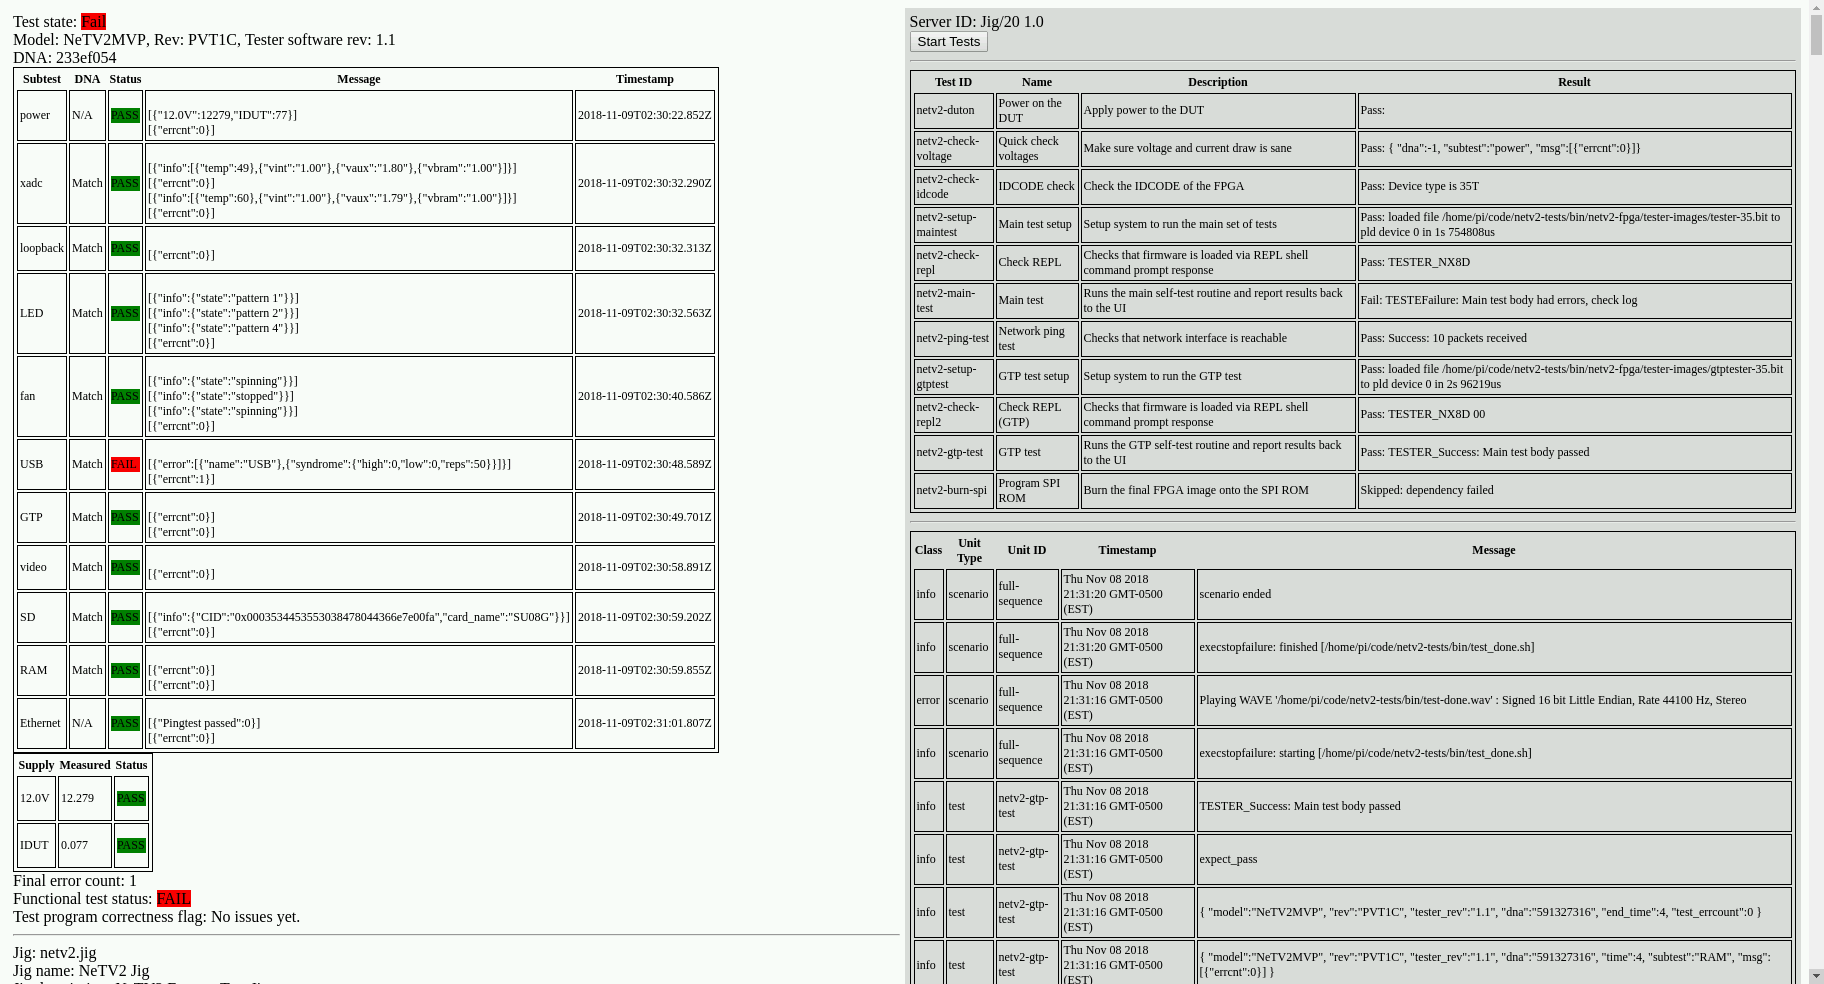
Which brings us to the interface layer. The NeTV2 jig has two options for UI: a set of LEDs, or an HDMI monitor. In an ideal world, the total amount of information an operator needs to know about a board is if it passed or failed – a green or red LED. Multiple instances of the test jig are needed when a product enters high volume production (thousands of units per day), so the cost of each test jig becomes a factor during production scale-up. LEDs are orders of magnitude cheaper than an HDMI monitor, and in general a test jig will cost less than an HDMI monitor. So LEDs instead of an HDMI monitor for UI can dramatically slash the cost to scale up production. On the other hand, a pair of LEDs does not give enough information to diagnose what’s gone wrong with a bad board. In a volume production scenario, one would typically collect the (hopefully small) fraction of failed boards and bring them to a secondary station where a more skilled technician debugs them. Exclave allows the same jig used in production to be placed at the debug station, but with an HDMI monitor attached to provide valuable detailed error reports.

With Exclave, both UI are integrated seamlessly using “.interface” files. Below is an example of the .interface file that starts up the http daemon to enable JSON debugging via an HDMI monitor.

In a nutshell, Exclave contains an event reporting system, which logs events in a fashion similar to Linux kernel messages. Events are tagged with metadata, such as severity, and the events are broadcast to interface handlers that further refine them for the respective UI element. In the case of the LEDs, it just listens for “START” [a scenario], “FAIL” [a test], and “FINISH” [a scenario] events, and ignores everything else. In the case of the HDMI interface, a browser configured to run in kiosk mode is pointed to the correct localhost webpage, and a jquery-based HTML document handles the dynamic generation of the UI based upon detailed messages from Exclave. Below is a screenshot of what the UI looks like in action.

The UI is deliberately brutalist in design, using color to highlight only the most important messages, and also includes audible alerts so that operators can zone out while the test runs.

As you can see, the NeTV2 production tester tests everything – from the LEDs to the Ethernet, to features that perhaps few people will ever use, such as the SD card slot and every single GPIO pin. Thanks to Exclave, I was able to get this complex set of tests up and running in under a month: the first code commit was made on Oct 13, 2018, and by Nov 7, I was largely just tweaking tests for performance, and to reflect operational realities discovered on the factory floor.

Also, for the hardware-curious, I did design a custom “hat” for the Raspberry Pi to add several ADC channels and various connectors to facilitate testing. You can check out the source for the tester hat at the Alphamax github repo. I had six of these boards built; five of them have found their way into various parts of the NeTV2 production flow, and if I still have one spare after production is stabilized, I’m planning on installing a replica of a tester at HAX in Shenzhen. That way, those curious to find out more about Exclave can walk up to the tester, log into it, and poke around (assuming HAX agrees to this).

Let’s Stop Re-Inventing the Test Jig!
The unspoken secret of hardware is that behind every product, there’s a robust test jig making sure that every unit shipped to end customers meets quality standards. Hardware startups that don’t anticipate the importance and difficulty of creating such a tester often encounter acute (and sometimes fatal) growing pains. Anytime I build more than a few copies of a piece of hardware, I know I’m going to need a test jig – even for bespoke, short-run products like a conference badge.

After spending months of agony re-inventing the wheel every time we shipped a product, Xobs decided to create Exclave. It’s still a work in progress, but by now it’s been used as the production test infrastructure for several volume products, including the Chibi Chip, Chibi Scope, Tomu, The Phage Blinky Badge, and now NeTV2 (those are all links to the actual Exclave test scripts for each of the respective products — open source ftw!). I feel Exclave has come along far enough that it’s time to invite more users to join the Exclave community and give it a try. The code is located on github and is 100% open source, and it’s written in Rust entirely by Xobs. It’s my hope that Exclave can mature into a tool and a community that will save countless Makers and small hardware startups the teething pains of re-inventing the test jig.


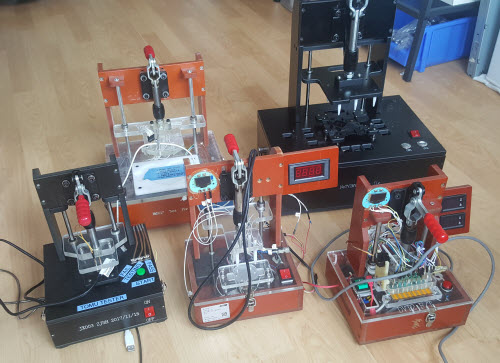
Production-proven testjigs that run Exclave. Clockwise from top-right: NeTV2, Chibi Chip, Chibi Scope, Tomu, and The Phage Blinky Badge. The badge tester has even survived a couple of weeks exposed to the harsh elements of the desert as a DIY firmware updating station!

You Can’t Opt Out of the Patent System. That’s Why Patent Pandas Was Created!

Friday, November 30th, 2018

A prevailing notion among open source developers is that “patents are bad for open source”, which means they can be safely ignored by everyone without consequence. Unfortunately, there is no way to opt-out of patents. Even if an entire community has agreed to share ideas and not patent them, there is nothing in practice that stops a troll from outside the community cherry-picking ideas and attempting to patent them. It turns out that patent examiners spend about 12 hours on average to review a patent, which is only enough time to search the existing patent database for prior art. That’s right — they don’t check github, academic journals, or even do a simple Google search for key words.

Once a patent has been granted, even with extensive evidence of prior art, it is an expensive process to challenge it. The asymmetry of the cost to file a patent — around $300 — versus the cost to challenge an improperly granted patent — around $15,000-$20,000 — creates an opportunity for trolls to patent-spam innovative open source ideas, and even if only a fraction of the patent-spam is granted, it’s still profitable to shake down communities for multiple individual settlements that are each somewhat less than the cost to challenge the patent.

Even though in practice open source developers are “in the right” that the publication and sharing of ideas creates prior art, in practice the fact that the community routinely shuns patents means our increasingly valuable ideas are only becoming more vulnerable to trolling. Many efforts have been launched to create prior art archives, but unfortunately, examiners are not required to search them, so in practice these archives offer little to no protection against patent spamming.

The co-founder of Chibitronics, Jie Qi, was a victim of not one but two instances of patent-spam on her circuit sticker invention. In one case, a crowdfunding backer patented her idea, and in another, a large company (Google) attempted to patent her idea after encountering it in a job interview. In response to this, Jie spent a couple years studying patent law and working with law clinics to understand her rights. She’s started a website, Patent Pandas, to share her findings and create a resource for other small-time and open source innovators who are in similar dilemmas.

As Jie’s experience demonstrates, you can’t opt-out of patents. Simply being open is unfortunately not good enough to prevent trolls from patent-spamming your inventions, and copyright licenses like BSD are well, copyright licenses, so they aren’t much help when it comes to patents: copyrights protect the expression of ideas, not the ideas themselves. Only patents can protect functional concepts.

Learn more about patents, your rights, and what you can do about them in a friendly, approachable manner by visiting Patent Pandas!

Developing Apps for Your TV the Easy and Open Way

Wednesday, June 6th, 2018

The biggest screen in your house would seem a logical place to integrate cloud apps, but TVs are walled gardens. While it’s easy enough to hook up a laptop or PC and pop open a browser, there’s no simple, open framework for integrating all that wonderful data over
the TV’s other inputs.

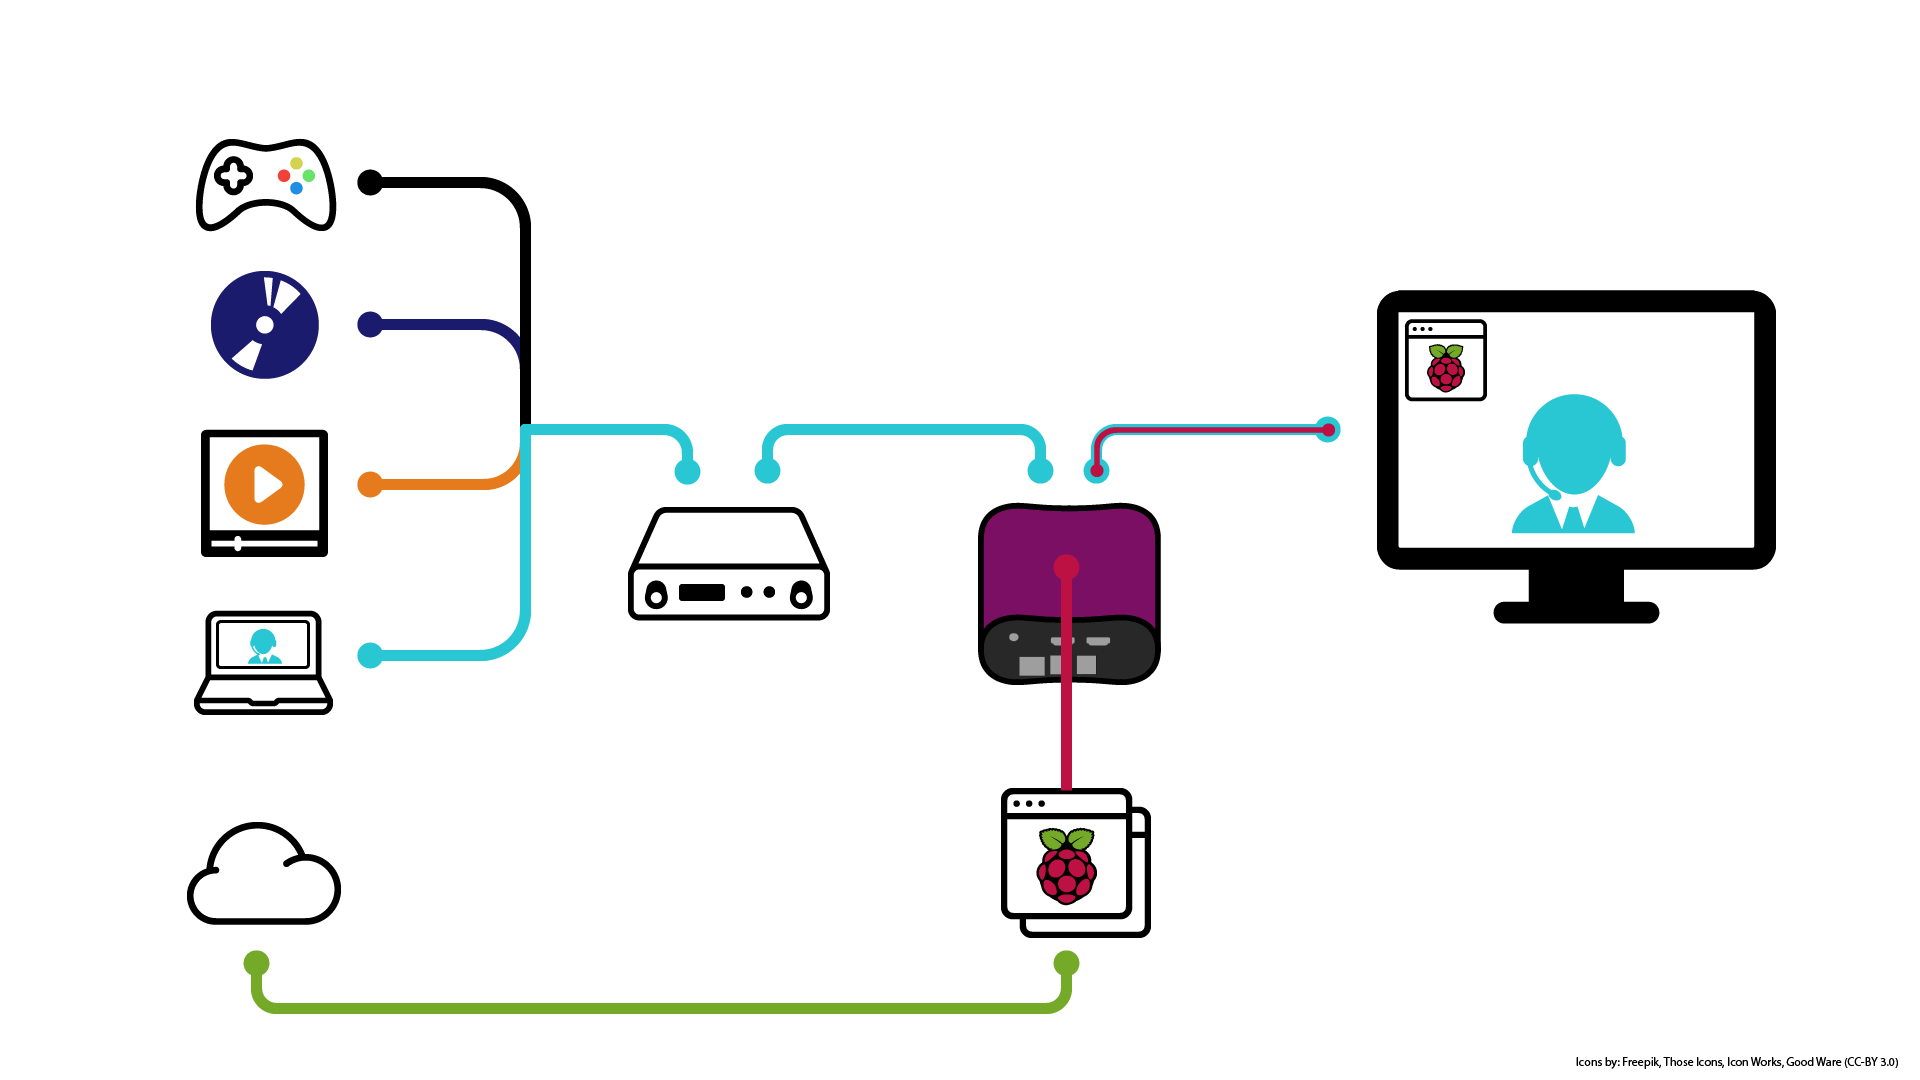
Until now. Out of the box, NeTV2’s “NeTV Classic Mode” makes short work of overlaying graphics on top of any video feed. And thanks to the Raspberry Pi bundled in the Quickstart version, NeTV2 app developers get to choose from a diverse and well-supported ecosystem of app frameworks to install over the base Raspbian image shipped with every device.

For example, Alasdair Allan’s article on using the Raspberry Pi with Magic Mirror and Google AIY contains everything you need to get started on turning your TV into a voice-activated personal assistant. I gave it a whirl, and in just one evening I was able to concoct the demo featured in the video below.


Magic Mirror is a great match for NeTV2, because all the widgets are formatted to run on a black background. Once loaded, I just had to set the NeTV2’s chroma key color to black and the compositing works perfectly. Also, Google AIY’s Voicekit framework “just worked” out of the box. The only fussy bit was configuring it to work with my USB microphone, but thankfully there’s a nice Hackaday article detailing exactly how to do that.

Personally, I find listening to long-form replies from digital assistants like Alexa or Google Home a bit time consuming. As you can see from this demo, NeTV2 lets you build a digital assistant that pops up data and notifications over the biggest screen in your house using rich visual formats. And the best part is, when you want privacy, you can just unplug the microphone.

If you can develop an app that runs on a Raspberry Pi, you already know everything you need to integrate apps into any TV. Thanks to NeTV2, there’s never been an easier or more open way to make the biggest screen in your house the smartest screen.

The NeTV2 is crowdfunding now at CrowdSupply.com, and we’re just shy of our first stretch goal: a free Tomu bundled with every board. Normally priced at $30, Tomu is a tiny open-source computer that fits in a USB Type-A port, and it’s the easiest way to add an extra pair of status LEDs to an NeTV2. Help unlock this deal by backing now and spreading the word!