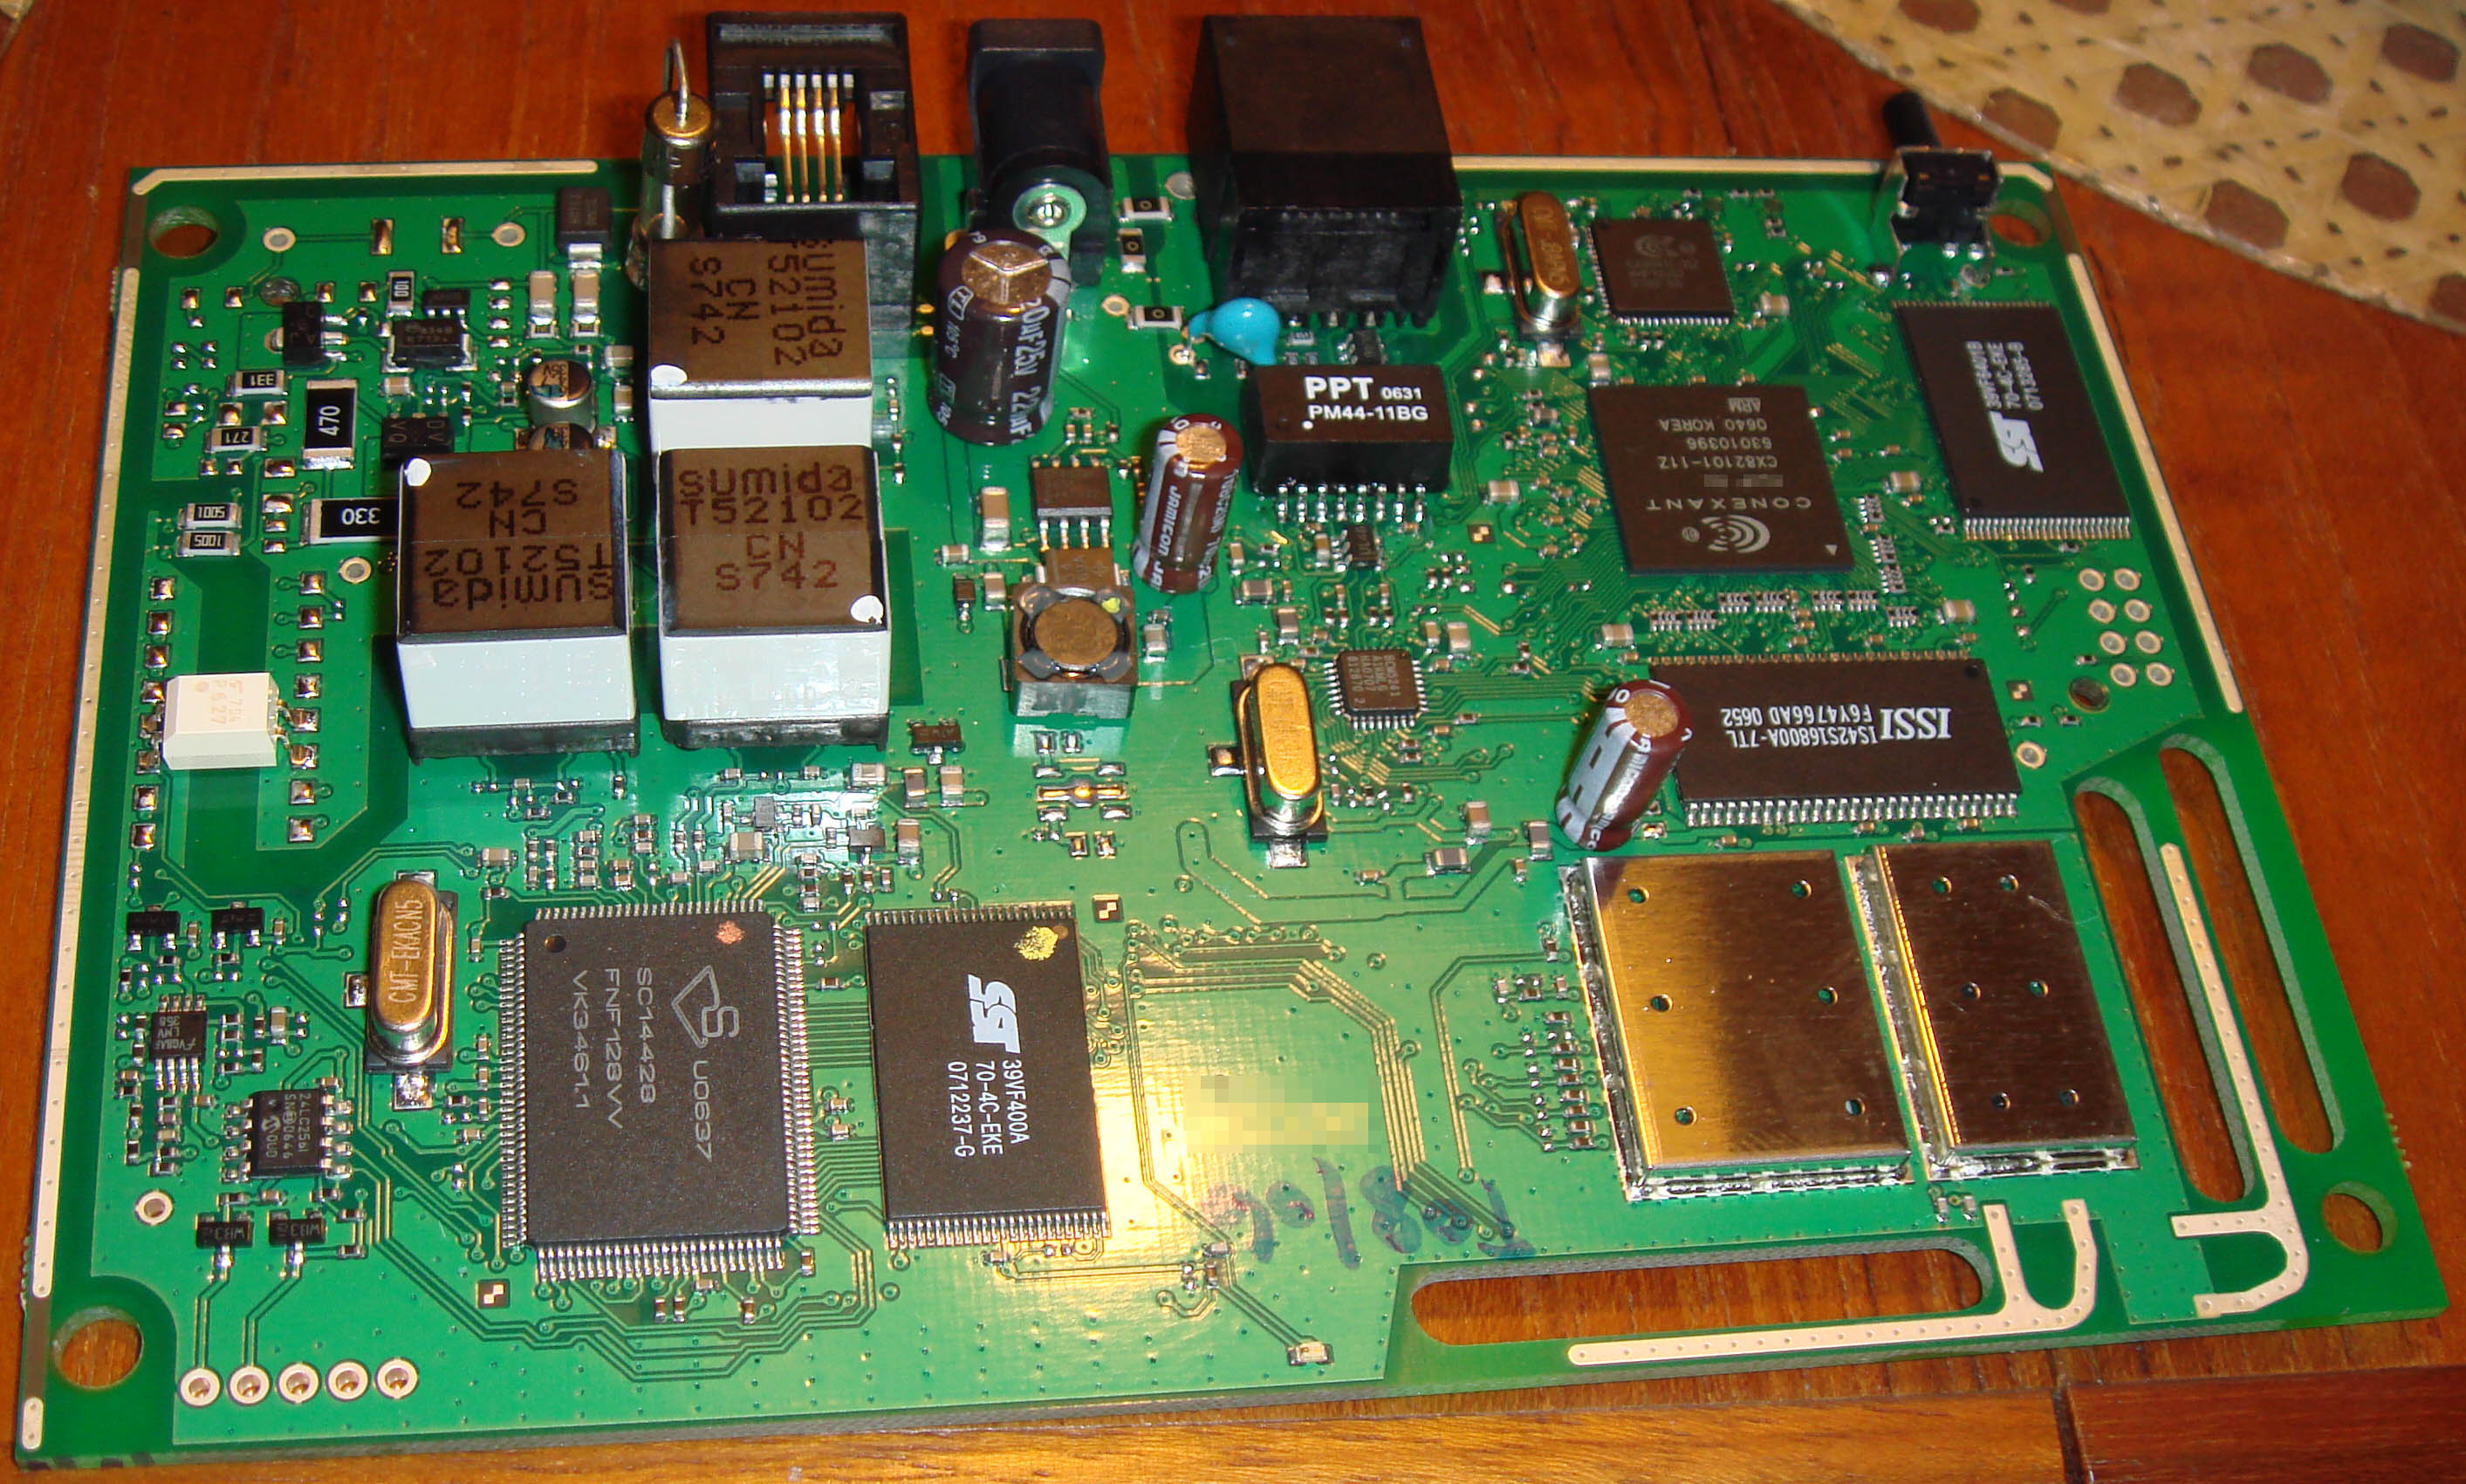
Name that Ware January 2008

February 8th, 2008

The ware for January 2008 is shown below. Click on the image for a much larger version.

This photograph isn’t of the whole unit, it’s just of one (important) part of it; but I think that’s part of the challenge. I believe there are enough hints buried in the photograph for one to deduce exactly what product this comes from.

This month, I will again be able to offer a dent-and-scratch chumby as a prize. Have fun!

Winner of Name that Ware December 2007!

February 8th, 2008

The ware from December 2007 was a Philips AJL308 “Clock Radio”.

It’s a nice past-time of mine to go to the local retail store, buy something off the shelf that looks relevant to my area of interest, and take it apart. I did a little tear-down writeup which I share as a link with anyone who cares to read it; it’s a lot of words and images for a blog post. These days, an alarm clock radio with a graphic LCD screen is interesting from my perspective and I can learn a thing or two from the design choices made by Philips in creating a product like this. I saw it on the shelf at Meijer’s while I was doing my last-minute Christmas shopping, so I got one, took it home and plucked it apart. Yes, this is what I do when I go home for Christmas; then again, it didn’t phase my parents at all to see alarm clock guts all over the dining room table. It’s just what curious kids do, right?

As for the winner, it’s super-hard to pick a winner this time; so many thoughtful posts. I think I’ll have to go with Dave Z this time — he did get the answer exactly right; if it wasn’t for his third post talking a bit more about his analysis and methods for arriving at it, he would have been beaten out by some of the other quality posts that didn’t quite arrive at the right answer but had great insight. Congratulations, contact me for your prize!

Xbox360 RROD (Again)

January 21st, 2008

Nate just linked me to this post interviewing an inside source in Microsoft about the causes of the RROD. Now that I’m involved in hardware manufacturing of consumer devices, it’s a fascinating case study of what not to do, so I’m paying attention and taking notes.

A while back I posted that I was looking for an RROD Xbox360; I actually sent it off to MEFAS to get digested for solder joint inspection on the GPU through a process called “dye and pry”. In this process, the motherboard is flooded with red ink, and then the GPU is mechanically pried off the board. The red ink flows into any of the tiny cracks in the solder balls, and at least in theory, when you pry the GPU off the cracked regions will shear first so you will be left with visible red spots at the points of failure.

The findings were interesting. Below is what a normal ball looks like after the test:

(click on the image for a larger version)

And here is one of several balls on the GPU that exhibited signs of partial failure:

There was also some “voiding” seen in the balls, e.g. trapped gas bubbles inside the solder balls that might serve as starting points for mechanical failure. Some voiding is expected, and there’s not a lot of data I can find correlating failure with voiding, but I could imagine in a stressful mechanical environment these things don’t help.

I was a bit puzzled by these results because you didn’t see any “catastrophic” failure — pools of red ink over a connection interface — just partial cracking. Partial cracking isn’t terribly uncommon, and many products work quite well despite such artifacts. However, after reading the article linked above, if Microsoft shorted safety margins around many of the design parameters to get the product out on time, it makes sense that the summation of many partial failures could lead to a total system failure — failures that have symptoms that vaguely cluster together but are difficult to point to any single root cause. Heisenbugs. Yuck.

Complex systems are a bitch to get right — and reliable. I think about that every time I step onto an airplane, or when I read about the space program. Respect to the engineers at Boeing and NASA!

CES08 Faves

January 8th, 2008

I saw a couple of things at CES this year that I actually thought were worthy of sharing. Usually it’s just faster, shinier, bigger, badder gadget after gadget — yawn. I’m pretty jaded, you could say, when it comes to gadgets. I still carry around and cherish my aging Blackberry, and despite the nasty inch-long crack in the front bezel everything works great. It’s almost a badge of honor–no iPhone could handle that kind of real-world abuse and keep on serving its owner so faithfully.

The most stunning thing I saw at CES this year was no gadget, however. It was a mock-up of the “motherglass” substrate that Sharp uses to make its 57″ LCD panels.

That is indeed the mother of all glass substrates.

There’s these huge frickin machines somewhere out there in this world that takes in that 9 foot piece of glass and deposits thin films of silicon on it, and images microscopic patterns into the films to make all those big, beautiful hi def LCD displays that the gadget freaks lust after. I lust after the machine that makes those panels–eight 57″ LCDs panels at a time. It makes those 12″ wafers at the Intel booth look well…small.

Other noteworthy things were the 128 gigabyte 2.5″ solid state flash drive for laptops that Toshiba had on display at their booth. I think there was another vendor that offered drives like this–Sasmung I think? But they didn’t have the circuit boards out for me to gawk at like Toshiba did.

Click on the image for a larger version of the circuit board. The drives are currently priced at $10/gigabyte, but hey, you know, Moore’s law will fix that eventually (although eventually is getting pushed out farther and farther as Moore’s law slows down). These drives are much faster than a standard hard drive for random seek, so it makes things like rebooting your laptop happen in half the time. Personally, I’d love to see this technology combined with a couple gigabytes of embedded DRAM and a smart caching chip to make one wicked fast mass storage device.

The other thing I saw that was neat is a Menlow-based motherboard, the first I had seen. I uhh…forgot what product it was in, it’s some Toshiba ultra mobile PC, but who cares about that; I’m sure engadget has some article on it if you’re into those kinds of things. The motherboard was the interesting part for me.


Click on the image for a larger version of the motherboard.

That’s it for now — I only got through about a third of the exhibits there so far, I had a lot of meetings for the past couple of days. If I find anything else really interesting tomorrow I’ll post it!

24C3

January 7th, 2008

I had the fortune this year of being able to attend 24C3, the 24th annual Chaos Computer Congress. The conference was a lot of fun–probably the first time in a long time (at least since chumby started) that I got to sit down and just hack for a couple of days on fun projects…in between going to really interesting and stimulating talks, and enjoying Berlin’s nightclub scene. C-base was quite fun (DJ Vela played a great set), and there’s no closing time in Berlin: one club we visited had a line-up that went to 10 AM (I gave out around 6 AM…).

I had the privilege of sitting at a table in the Hackcenter with a group of console hackers that were scary smart and doing very cool things that shall remain unnamed, at least until they are ready to disclose their fascinating findings. It’s quite humbling and inspiring to watch them work. I also got a chance to chat with some silicon hackers that presented a great talk about reversing CRYPTO-1. It’s always a pleasure to be exposed to so many brilliant minds and osmotically absorb knowledge and techniques by just being around them–but that’s one of the reasons you go to a conference, after all.

The table I was sitting at had a half dozen Xbox360’s brought in by tmbinc and ole, set up as a Linux cluster. People had a lot of fun hacking the boxes.

While a lot of American hackers drink Red Bull, it seems the drink of choice by German hackers is “Clubmate”, pronounced “cloob mah-tay”. It’s an herbal energy drink that’s a bit of an acquired taste, but it definitely “works”.

I decided to play with phidgets while I was at 24c3; a few months ago a chumby user mentioned it in the forum and I bought an 8/8/8 interface board (8 analog, 8 digital in, 8 digital out) and a few of the 3052 solid state relay boards (there’s also a 3051 relay board for those who want to control lights and appliances). Of course, “spare time” never happened, but the Hackcenter in 24c3 was the perfect place to steal away for a couple days and play with one of my favorite pastimes, namely robotics.

Cross-compiling the basic Linux phidgets driver was fairly straightforward; I just had to modify the makefile to explicitly use arm-linux-gcc instead of the default host compiler. I then copied the libphidget21.so onto the chumby root file system–not quite as easy, as it’s a cramfs read only filesystem. Since I didn’t have my full chumby development environment on hand, I grabbed one of the chumby OTA update distribution filesystems, mounted it as a loopback volume, tar copied the contents out, added the library files, and then regenerated the cramfs filesystem. It’s a lot of work if you’re not comfortable with Linux; an easier way to handle this is to just statically link your binaries against libphidget21.a.

Compiling the phidget example file was a bit more difficult. The standard header set for the phidget examples were missing some files that I needed, which took me a while to figure out. Instead of onion-peeling to try and figure out exactly which header files were missing, I just pasted in a whole pile of them and finally it worked.

The other key thing you need to do on the chumby is to mount the usbfs filesystem–this would have taken me forever to figure out if tmbinc hadn’t chimed in–using the command “mount -t usbfs null /proc/bus/usb/” did the trick.

After doing all this, I was able to run the ifkit.c example file (contained inside the phidgets driver tree) and observe the 8/8/8 sensor board returning interesting results.

The next step was to get the phidget to actually do something. So, I went across the street to the MediaMarkt shopping mall and bought a random RC toy car while grabbing a bite to eat. Ole and I pondered for a while about the best way to connect the phidget to the RC car. The steering mechanism for the car didn’t use a servo motor as I had suspected, it actually used an underdriven DC motor that relies on its stall current to force the wheels left or right. My guess is that the motor controller board in the car did a PWM or had a current limit built into it to prevent the motor from burning out. Driving this full tilt with a simple solid state relay was almost sure to cause trouble, so we decided to take the remote controller circuit board out of its case and wire the solid state relays across the slide-switch terminals that the RC controller used to control front/back and left/right directions. So the control path was like this: chumby application -> phidget driver -> USB -> phidget board -> solid state relay -> RC controller switches -> modulated to 27 MHz -> transmitted over a distance of 1″ -> demodulated -> motor driver -> motors. It’s a bit like IM’ing someone in the same room with you, but hey, people do it sometimes. We mounted the phidget controller board and the RC controller inside the housing of the RC car, so you couldn’t see the hack–all you saw was a USB cable coming out of the car body, and then this was plugged into the chumby, which was taped to the car’s hood.

That’s what the initial assembly looked like at this point; we used an Energizer ER-PHOTO battery pack (mentioned in the previous blog post) to power the extra electronics. Plenty of duct tape was used, which is charmingly referred to by Germans who don’t know the English term for it as “that silvery tape that MacGyver uses”.

Of course, driving around an RC car via a chumby with a serial debug cable connected to it is really lame. Fortunately, I had a second chumby (actually, it was tmbinc’s chumby), so I wrote a quick server/client protocol that establishes a UDP connection between the two chumbys over the WiFi link that allowed me to stream basic commands to the car (basic meaning, a single 32-bit unsigned int containing a bit vector of commands). Ole then suggested that it would be really cool to use the accelerometer in the chumby to control the driving of the RC car by tilting the chumby, so I hacked up the server to transmit the pitch and roll of the chumby in degrees to the client. I also used the the bend switch as a “zeroing” function, so that if you squeeze the chumby, the car immediately stops and the relative “zero tilt” position is recalibrated.

[flashvideo filename=images/remote_control1.flv /]

Above is a video (with sound) of the wifi chumby-car driving around. The room at the Hackcenter is of course kept very dark, so all you can really see is the chumby’s LCD screen going by, and you can see me tilting the other chumby around to control the direction of the car–and you can hear the motors of the RC car doing their thing. Here’s a link to the source code used by the system.

Of course, this wasn’t good enough. You could only drive the car around within visual range, but WiFi can go much further than that. If we could only find a way to see what the car was seeing…

It just so happened that tmbinc and ole brought along a complete DVB-T encoder/transmitter/receiver setup–for what reason, I’m not sure, but hey, that’s the joy of being around hardware hackers, they just have the coolest stuff on hand (Ole had a rad ERSA gas-powered soldering iron, for example). So, we soldered on a power tap to the chumby (fortunately, the DVB-T encoder could also eat the 12V supplied by the ER-PHOTO pack), and taped the DVB-T encoder onto the roof of the RC car, after wrapping it up in some protective foam. We also taped my Sony Cybershot DSC T-10 camera onto the car, which fortunately had a PAL video output that we could feed right into the assembly. We then borrowed a pair of DVB-T antennae from another hacker who “just happened” to have some of these on hand. Finally, we strapped on this super-bright battery powered flashlight that Ole had, and we were ready to rock.

The above picture was ripped from tmbinc’s blog. Click on the photo for a larger version.

Above is the car’s eye view of the world. The video was being compressed on the fly into MPEG-2 and transmitted over the air, so it was a bit laggy–about a one second delay, so driving the car took some skill to anticipate where you needed to turn before it happened.

As a final touch, we configured the chumby on the RC car to play Shoutcast streaming radio (hey, it’s still a full-featured chumby, showing widgets and playing music like it was designed to), so that as the car drove around it played some bright techno music to announce its presence.

[flashvideo filename=images/remote_techno.flv /]

Above is a video taken from the car’s-eye view, with the toe-tapping techno sound track streaming over Shoutcast to the chumby and being decoded while the chumby also handled the car driving task.

The final control paths for the system thus looked like this:

sensors -> chumby server app -> UDP packet -> 802.11 wifi transmitted over 10’s of meters -> client client app -> phidget driver -> USB -> phidget board -> solid state relay -> RC controller switches -> modulated to 27 MHz -> transmitted over a distance of 1″ -> demodulated -> motor driver -> motors

Sony DSC-T10 camera -> PAL -> DVB-T encoder -> MPEG-2 format -> DVB-T wireless transmission over 10’s of meters -> DVB-T receiver

Plus, of course, the normal widget stream coming from the chumby servers in the US via the Wifi interface as well. After all, what Wifi controlled toy car isn’t complete without streaming internet radio, Flash movies of Chuck Norris facts and “interesting” Flickr streams playing on it.

It’s a bit of a Rube Goldberg machine, but that’s the joy of abstraction (and abusing abstractions).

And that’s what I did over my Christmas holiday :-)